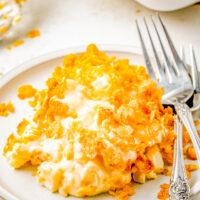
Cheesy Funeral Potatoes
Cheesy Funeral Potatoes — This casserole is creamy, CHEESY, and topped with crunchy Corn Flakes! It’s an easy side dish that feeds a crowd, so it’s perfect for potlucks, holidays like Thanksgiving and Christmas, and family gatherings. Just 10 minutes of active prep time make this one of the EASIEST casseroles ever! No funeral luncheon required to enjoy this comfort food family favorite!
Servings: 12
Calories: 504kcal
Ingredients
Casserole
- ½ cup unsalted butter melted
- ¼ cup all-purpose flour
- 1 cup milk whole is what I use, 2% may be substituted, at room temp
- 2 cups full fat sour cream at room temp
- 1 cup shredded cheddar cheese at room temp
- 1 cup shredded Colby Jack cheese at room temp
- 1 teaspoon onion powder
- 1 teaspoon garlic powder
- 1 teaspoon chicken bouillon
- ½ teaspoon salt or to taste
- ½ teaspoon freshly ground black pepper or to taste
- 32 ounces diced or cubed hash browns from a frozen package that are thawed (shredded hash browns may be substituted)
Topping
- 3 cups corn flakes crushed
- ¼ cup unsalted butter melted
Instructions
- Preheat oven to 350F and spray a 9x13-inch baking dish (or 2.5 to 3 quart baking dish) very well with cooking spray; set aside.
- Casserole - To a large saute pan, add the butter, and heat over medium-high heat to melt, whisk constantly.
- Add the flour and cook for 1 minute; whish constantly. Tips - Do not shortcut this step. First, you need to cook the flour or later on yoru casserole will have an odd raw flour taste. Secondly, this is a roux, which is what is used to help thicken the cream sauce and casserole later on, since we are not used any canned/condensed/cream-of style soups.
- Slowly add the milk; whisk constantly and continue to do so for about 1 minute, or until the sauce begins to thicken slightly.
- Add the sour cream and whisk to combine.
- Add both cheeses, all three seasonings, salt, pepper, and whisk constantly until the cheese has melted.
- Add the hash browns and stir to combine and coat evenly.
- Turn the mixture out into the prepared pan; set aside momentarily.
- Topping - To a large bowl, add the Corn Flakes. Tip - I crush the corn flakes in my hand, a heaping handful at a time. They don't have to be in a fine dust or too small. Therefore crushing them in my hand is the fastest, easiest, and creates no extra dishes or appliances to wash.
- Evenly drizzle the melted butter over the cereal and toss to evenly coat, noting that it won't seem like there's quite enough butter, but it's enough to just moisten some of the flakes, which is that's needed.
- Evenly add the topping over the casserole.
- Bake for about 25 minutes, or until the lightly golden browned and bubbling around the edges, or as desired. Tip - I rotate my pan once midway through for even baking and browning. All ovens vary, so just keep an eye on your casserole to make sure the corn flakes aren't getting overly browned nor are burning.
- Serve immediately. Leftovers will keep airtight in the fridge for up to 5 days, or in the freezer for up to 3 months. Note that the Corn Flakes will not stay crispy on the leftovers or for anything that's been frozen. They absorb the moisture from the cheesy potatoes below and that's just the way it is. See below for make-ahead tips.
Notes
Make-Ahead Directions: To make this popular side dish ahead of time, say for Thanksgiving, Christmas, or a family event, prep the recipe as written through Step 8. At that point cover it, and you can refrigerate it for up to 3 days. Although 24-36 hours would be more ideal. Take it out of the fridge at least 30 minutes before you plan to bake it off. Preheat you oven, and while it's heating up, make the topping as directed, sprinkle it over the top, and bake as directed.
Nutrition
Serving: 1 | Calories: 504kcal | Carbohydrates: 33g | Protein: 9g | Fat: 38g | Saturated Fat: 17g | Polyunsaturated Fat: 18g | Cholesterol: 73mg | Sodium: 748mg | Fiber: 2g | Sugar: 4g