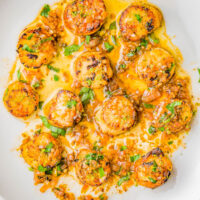
Pan Seared Garlic Butter Scallops
An EASY, one-skillet, 15-minute recipe that tastes restaurant-worthy, yet is incredibly SIMPLE to make at home! Even if you've never made scallops at home before, this is a foolproof recipe for pan-seared, tender, juicy scallops coated in garlic butter with lemon and citrus notes that's sure to IMPRESS! A wonderful choice for a special holiday meal, an anniversary or birthday dinner, or date-night-in!I plan that each person will eat about 5 to 6 scallops (and there are usually about 10 to 12 fresh sea scallops per pound); therefore the recipe, as written, serves 2. Although you can easily size it up for a larger group. Just don't crowd them in your skillet!
Servings: 2
Calories: 502kcal
Ingredients
- 1 pound fresh sea scallops* about 10 to 12 scallops
- Kosher salt or sea salt to taste
- Freshly ground black pepper to taste
- 2 tablespoons unsalted butter
- 2 tablespoons olive oil
- 2 tablespoons finely minced shallots
- 2 to 3 cloves garlic finely minced
- 1 to 2 teaspoons lemon or lime zest
- 2 tablespoons freshly squeezed lemon or lime juice
- Fresh parsley finely minced; optional for garnishing (or another fresh herb of your choice such as tarragon, chives, basil, mint, etc.)
Instructions
- Blot dry the scallops with paper towels which helps them sear better.
- Evenly season the scallops on both sides with salt and pepper, to taste.
- To a large skillet, add the butter, olive oil, and heat over medium-high heat to melt the butter, swirling the pan to help it along. Skillet Tips - For the photos, I used a nonstick 10-inch skillet. However, I also love to make this recipe in my 3-quart All-Clad Stainless Steel Saute Pan, which is my personal go-to for most cooking. It sometimes goes out of stock, here’s the 4-quart version. You could also use a cast iron skillet if you know how to cook in cast iron and your skillet is well seasoned.
- After the butter has melted, add the scallops to the skillet so that they are not touching and have space between them. Tip - Do not crowd the scallops because it will cause them to steam rather than sear.
- Allow the scallops to cook (or sear) for about 2 to 2 1/2 minutes per side, or until a golden browned crust forms. Tip - Once you place the scallops in the skillet, just allow them to sear and do not try to 'check' on the underside too much; you'll be able to see the outer ring of brown crust when the time is right, but if you keep 'checking' the sear won't develop as nicely.
- While the scallops are searing on the second side, add the shallots, and allow them to saute for about 30 seconds. Then add the garlic, and allow it to saute until fragrant, about 1 minute. By this time your scallops should be done. Do not overcook!** (See Notes for determining doneness)
- Take the skillet off the heat, evenly sprinkle the zest over the scallops, evenly squeeze the juice over the top, and gently toss the scallops to evenly coat them with zest and juice, spooning the sauce back over them with a small spoon, or as necessary.
- Optionally, evenly garnish with fresh parsley and serve immediately. Scallops are best fresh and warm. While they will technically keep airtight in the fridge for up to 3 days, they're simply best when eaten after they've been freshly made.
Notes
*Scallops - I only make this recipe with fresh sea scallops. They can range in size from about 10 to 40 per pound, depending on their size. But in reality, about 10 to 12 scallops per pound is the norm. This recipe calls for 1 pound of fresh sea scallops, which again I find t be about 10 to 12 scallops. I do not recommend bay scallops nor frozen scallops, although your mileage may vary.
**How To Tell When Scallops are Done
- Golden Brown Sear – Both the top and bottom should be seared and lightly golden brown. If you have a nice golden crust, the rest of these things (mentioned below) should naturally fall into place since it’s almost impossible to sear them properly and not have the following items just ‘happen’.
- Opaque – The white of the scallop should have turned opaque, not translucent like when they were raw.
- Edges A Bit Broken Apart – If you look at the edges by the seared areas and you see them a bit separated, with small but notable vertical cracks, yep they’re done!
- Firm, but Not Hard – If you press a finger or fork on the top of the scallop, it should be firm, but not hard (yikes, that means they’re overcooked), It should indent a bit with gentle pressure, similar to say a properly cooked boneless skinless chicken breast texture.
- Fork Tender – You shouldn’t need a steak knife to cut a scallop, which would indicate it’s probably already overcooked, womp. A properly cooked scallop is easily broken apart with a fork. Tender, buttery, and easy to break apart.
Nutrition
Serving: 6 | Calories: 502kcal | Carbohydrates: 20g | Protein: 48g | Fat: 27g | Saturated Fat: 10g | Polyunsaturated Fat: 16g | Cholesterol: 124mg | Sodium: 1966mg | Fiber: 2g | Sugar: 2g