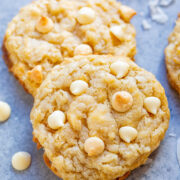
Coconut White Chocolate Cookies
Soft, chewy, and so moist thanks to the coconut and browned butter with the PERFECT amount of white chocolate!! If you like white chocolate, you will LOVE these spring and summery-tasting EASY cookies!!
Servings: 16
Calories: 208kcal
Ingredients
- ½ cup unsalted butter melted and browned
- 1 large egg
- ½ cup granulated sugar
- ¼ cup light brown sugar packed
- 2 teaspoons vanilla extract
- 1 cup sweetened shredded coconut lightly packed to measure
- 1 ¼ cups all-purpose flour
- 1 teaspoon baking soda
- ½ teaspoon salt
- 1 cup white chocolate chips plus more for adding to the tops
Instructions
- Brown the butter (<—click for a detailed tutorial) by cooking butter over medium heat in a medium saucepan until it’s amber to brown in color, about 5 minutes depending on pan size. I swirl the pan in the last minute or so to make sure I can really see the color changes. Butter will go through stages of hissing, sputtering, and making noise until the water cooks off at which point the browning occurs. Butter will smell nutty and aromatic.
- Pour browned butter, and scrape out any browned bits from the kettle, into the bowl of a stand mixer or to a large mixing bowl and allow it to cool for about 15 minutes.
- Add the egg, sugars, and beat on medium-speed for about 3 minutes, or until creamed (a baking term, you're not adding any cream) and slightly fluffed and smooth. Note - batter will not fluff and cream like batter that uses room temperature butter because this butter was melted; this is normal.
- Add the vanilla and beat to incorporate.
- Add the coconut and beat to incorporate.
- Add the flour, baking soda, salt, and beat to incorporate; don't overmix.
- Add 1 cup chocolate chips and beat to incorporate.
- Using a medium cookie scoop, divide the dough into 16 equal-sized portions. Tip - My advice is not to try to make bigger or smaller cookies or alter the yield of exactly 16 cookies because coconut burns easily and there is a reason why we are making 16 cookies here.
- Place dough mounds on a large plate, cover with plasticwrap, and place in the freezer for 1 hour. Don't ask if you can place the whole mixing bowl in the freezer; you cannot. You need to portion the dough out onto a plate, then freeze. You could alternatively chill for 3 to 4 hours in the fridge.
- Preheat oven to 350F, line a light-colored baking sheet with a Silpat liner, place 8 mounds of dough on it, evenly spaced and ever-so-slightly flattened between the palms of your hands.
- Bake for about 13 minutes, or until your cookies are done. Very Important - Ovens, pans, climates, ingredients, etc. will cause cookies to bake at different rates so my baking guideline for my oven was 13 minutes, but yours may be different. Because coconut burns easily, as does white chocolate, keep a very close eye on your cookies and go by the cookies, not the clock. When they are done, the tops will barely look like they are set and will be pale and loose-looking, but they do firm up upon cooling. The undersides of the cookies, from what you can see when you are looking at them in the oven, without touching them, will be medium golden brown at the base when they are done. I also recommend rotating your baking sheet once midway through baking. I also recommend baking one sheet at a time (8 and then the other 8).
- Allow cookies to cool on baking sheet for at least 10 minutes, or until they are firm enough to move before serving.
- Tip - Immediately upon pulling cookies from the oven, add 3 to 4 white chocolate chips to the top of each cookie for visual appeal. The reason you do this after baking is because white chocolate is prone to scorching and they look better visually if added later. Does not affect taste, only appearance.
Notes
Storage: Cookies will keep airtight at room temp for up to 5 days, or in the freezer for up to 4 months. Alternatively, unbaked dough can be frozen for up to 4 months, and then baked off as desired, adding a couple minutes to the baking time if baking straight from the freezer.
Nutrition
Serving: 1 | Calories: 208kcal | Carbohydrates: 26g | Protein: 2g | Fat: 11g | Saturated Fat: 7g | Polyunsaturated Fat: 3g | Cholesterol: 29mg | Sodium: 176mg | Fiber: 1g | Sugar: 17g