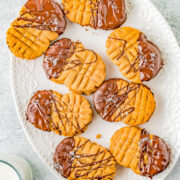
Homemade Nutter Butter Cookies
Homemade copycat Nutter Butters are so much better than the store bought originals! Creamy peanut butter filling is sandwiched between lightly crunchy peanut butter cookies. Pinches of optional sea salt and melted chocolate drizzled over the tops make these cookies simply THE BEST!
Servings: 8
Calories: 598kcal
Ingredients
Cookies
- 1 large egg
- 1 cup creamy peanut butter
- 1 cup granulated sugar
- 1 tablespoon all-purpose flour for dipping your fork**
- 1 teaspoon vanilla extract
- ½ teaspoon salt or to taste
Filling
- ¾ cup creamy peanut butter*
- ⅓ cup confectioners' sugar sifted if lumpy
- 2 to 3 tablespoons pure maple syrup OR honey
Toppings, Optional
- 3 ounces Ghirardelli Melting Wafers OR ⅓ cup chocolate chips milk or semi-sweet chocolate is fine, optional but recommended
- Flaky sea salt optional and to taste
Instructions
- Preheat oven to 350F, and line two baking sheets with parchment paper or a Silpat liner; set aside.
- Cookies - To a large mixing bowl, add all the ingredients and beat by hand to combine (stiff at first but very do-able) or with a handheld electric mixer until smooth and creamy.
- Using a small cookie scoop, form 1/2-teaspoon sized cookie dough balls, and place them on the prepared baking tray. Ideally, you'll make about 32 small cookie dough balls.
- When placing the cookie dough balls on the baking sheet, place them in pairs, so that two dough balls are touching. See photos in the blog post for a great visual reference. Evenly space the pairs over the baking sheets. This should make approximately 16 cookies.
- Using the base of a drinking glass or 1-cup measure, flatten the pairs of dough balls to about 1/4 to 1/8-inch in thickness. Tips - At this point you should have a "Mr. Peanut" shaped looking mounds of dough. If you don't, you can pinch the "waist" or junction point of the cookies a bit with your fingers to accentuate this.
- Dip the tines of a fork into flour and make the classic crisscross pattern into the cookie dough by going vertically from end to end, and then crosshatching horizontally from side to side. Make sure to use gluten-free flour if you need the cookies to be gluten free.
- Bake for about 9 to 11 minutes, or until the cookies are set and done; the longer you bake them, the crunchier they will be which is fine, but don't burn them. Tips - Bake one sheet of cookies at a time, on the center oven rack, rotating the baking sheet once midway through baking for optimal results.
- Allow the cookies to cool on the baking sheets for about 5 to 10 minutes, or until they're cool enough to remove. Tip - If you place the cookies in the freezer for about 10 minutes, this helps reduce breaking later on when you're spreading the filling onto them. And it also helps the optional melted chocolate set more quickly.
- Filling - Add the peanut butter, confectioners' sugar, 2 tablespoons of maple syrup or honey, and mix aggressively to incorporate. If the mixture is very thick and too stiff to mix, add 1 additional tablespoon of the maple syrup or honey, and mix to incorporate.
- Assembly - Spread a layer of filling on the underside of one cookie, pair it with another cookie, underside to underside; and repeat until all cookies have been filled and sandwiched together; yielding about 8 finished sandwich cookies.
- Toppings - Optionally, melt the Ghirardelli Melting Wafers according to package directions OR melt chocolate chips in a microwave-safe bowl in 20-second bursts, stopping to stir after each bursts, until the chocolate chips can be stirred smooth; don't overheat.
- Drizzle the melted chocolate over the cookies as desired. And/or dip one tip of the cookies into the chocolate. If you plan to dip a significant portion of cookies rather than drizzle, you'll need to melt additional chocolate.
- Optionally, sprinkle with flaky sea salt as desired.
- Allow the cookies to set up fully at room temp before serving. Cookies will keep airtight at room temp for up to 1 week, in the freezer for up to 4 months. Unbaked balls of cookie dough will also keep airtight in the freezer for up to 3 months. Thaw before baking to cold room temperature, enough to flatten paired cookie dough balls before baking as instructed above.
- Cookie dough base adapted from my own The Best Flourless Peanut Butter Cookies and Peanut Butter Chocolate Chunk Cookies
Notes
*I recommend classic peanut butter that does not separate and that you don't need to stir. Namely, peanut butter brands like Jif or Skippy are my go-to brands. You can likely use store brands or generic brands although I use the name brands. I recommend you use creamy peanut butter and not crunchy.
If you are a person who adores crunchy peanut butter, you could perhaps use it in the filling but I don't recommend it in the dough.
Finally, don't use reduced fat versions of peanut butter because your cookies won't bake up the same. They'll be much more prone to spreading in the oven. I have never baked with reduced sugar peanut butter but I suggest using good 'ole fashioned peanut butter like Jif or Skippy for optimal results.
**If you need the cookies to be gluten-free, either omit flouring your fork tines or make sure to use a certified gluten-free flour intended for baking.
Nutrition
Serving: 1 | Calories: 598kcal | Carbohydrates: 65g | Protein: 14g | Fat: 35g | Saturated Fat: 9g | Polyunsaturated Fat: 21g | Cholesterol: 24mg | Sodium: 502mg | Fiber: 4g | Sugar: 50g