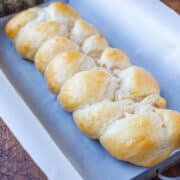
Challah Bread
This challah recipe comes from Artisan Bread in Five Minutes a Day: The Discovery That Revolutionizes Home Baking and is incredibly easy. I halved the full recipe and the recipe below makes two loaves of challah, one which can be baked after about 3 hours (first rise is two hours, second rise is 40 minutes). The other half of dough can be stored in the refrigerator for up to 5 days and baked off when you're ready. This is truly make-ahead dough and there's no kneading. It's extremely easy, fuss-free bread making, and great for anyone who's new to bread-making or challah-making. The challah turns out light, fluffy, almost croissant-like, with just a hint of sweetness and my Jewish husband approves. This was my first ever loaf of challah and I will use this recipe for a lifetime. The other half of dough, if you don't want to make a second loaf of challah with it, can be formed into dinner rolls or filled to make cinnamon buns.
Servings: 20
Calories: 154kcal
Ingredients
- scant 1 cup water warmed to about 125F for Platinum yeast, about 105 to 115F for most other yeast (full batch calls for 1 3/4 cups water)
- 2 ¼ teaspoons active dry yeast (one 1/4-ounce packet I use Red Star Platinum
- 2 large eggs
- ¼ cup canola or vegetable oil or 1/4 cup butter (oil creates a softer loaf, butter creates a crustier crust; butter-based dough is firmer and possibly easier to work with than oil-based, but I have no trouble with oil-based and prefer softer challah and use canola oil)
- ¼ cup honey
- ¾ tablespoon salt or to taste (the full recipe is 1 1/2 tablespoons salt, halved is 3/4 tablespoon, not teaspoon, which I think is way too much; I used no salt with great results)
- 3 ½ cups all-purpose flour I used 2 1/2 cups bread flour, and 1 cup all-purpose; the authors indicate that bread flour may be substituted if a chewier bread is preferred
- 1 large egg for egg wash
- sesame or poppy seeds for sprinkling optional
Instructions
- Making the Dough - Add the water to a glass measuring cup or microwave-safe bowl and warm the water to temperature, about 30 seconds on high power. Using a thermometer, check the temperature. If you don't have a thermometer, when inserting your finger, it should feel warm but not hot. Add the water to the bowl of a stand mixer fitted with the paddle attachment. Sprinkle the yeast over the water and let stand for 5 to 10 minutes.
- Add 2 eggs, honey, oil (or butter), salt to taste, and mix on low speed for about 2 minutes, until well combined. Remove the paddle, put on the dough hook, and add 3 cups flour. With the mixer on low speed, allow hook to fold in the flour; it will take a minute or two. Sprinkle in the remaining 1/2 cup flour and allow it to become just incorporated; don't move into actively kneading the dough; just incorporate the flour and turn mixer off.
- Turn dough out into a lightly greased large mixing bowl (do not knead it), cover bowl with plastic wrap, and allow it to rise in a warm place until doubled in volume, about 2 hours. Punch dough down and either move on to the next step (baking it) or dough can be stored in refrigerator for up to 5 days before baking it later. If baking later, place all the dough into a large bowl or container with a lid, allowing the lid to remain slightly ajar so there is a tiny bit of airflow, and refrigerate dough until you are ready to move onto the next step, Baking Day.
- Baking Day - You can move onto this step immediately after the 2-hour rise, or after the dough has been refrigerated for day(s).
- Divide dough in half; set aside other for later or make two loaves now. If dough is sticky, use floured hands to work with it. Place dough on a Silpat Non-Stick Baking Mat , adding a bit flour if necessary, or place it onto a floured work surface. Divide dough into 3 equal portions. Roll each portion out into a 12-inch long cylinder. The dough is very springy and will want to recoil and shrink back but be patient and keep stretching it or rolling it, either with your hands, a rolling pin, or just stretching it out as best you can; previously refrigerated dough behaves better and has less of a mind of its own.
- After you have 3 long cylinders about 1-inch each in diameter, place them on the baking mat and baking tray where you plan to bake them. Pinch one end of all three together and start braiding down, just like you're braiding hair. After you've reached the end, gently pinch off and tuck the ends underneath the loaf, just making it neat. Cover dough with plastic wrap and allow it to rise in a warm place for 40 minutes if using fresh dough, or for 1 hour 20 minutes if using previously refrigerated dough (even though my dough was fresh, I allowed it to rise for closer to 1 hour rather than just 40 minutes on the baking tray, placed on top of the preheating oven). Preheat oven to 350F midway through this rise.
- Beat 1 egg and immediately prior to baking, brush egg wash all over loaf (I use about half of the egg as I don't want bread to get too 'eggy', just shiny). Sprinkle with optional sesame or poppy seeds (I use neither). Bake for 22 to 25 minutes, or until challah is a pale golden and set. The internal temperature should be ~190F however I judge by color. Allow bread to cool before slicing or pulling apart and serving. I store bread wrapped in plastic wrap, then placed in a ziptop food storage bag or in an airtight container at room temperature for up to 5 days or in the freezer for up to 3 months.
- With the other remaining half of unbaked dough, it can be refrigerated for up to 5 days and then should be used; or it can be frozen and then thawed, and used. This dough may be used for more challah; raisins may be added, or used in dinner rolls, cinnamon rolls; or get creative with it.
Notes
This recipe is a half-batch of the Challah recipe in Artisan Bread in Five Minutes a Day: The Discovery That Revolutionizes Home Baking and makes two one-pound loaves. Make one now, make the other within 5 days for egg-enriched dough, storing the extra dough in the refrigerator until baking day. The full batch makes 4 loaves.
The instructions outlined here are how I interpreted and adapted the recipe, making it as streamlined as possible and makes the dough mixing extremely easy and fast.
The ingredients listed in the recipe are half of what is outlined in the recipe in the book. It's noted in almost all recipes within the book, "This recipe can easily be halved or doubled", and I chose to halve it.
I question their quantity of salt; I would think twice before adding that much salt to a sweet-ish bread; I used none. I used oil because I wanted a softer and less crusty bread; butter will create a firmer crust. I did, however, want chewier bread and used a combination of all-purpose and bread flour; the book calls for all-purpose in this recipe. However, in the opening chapter they give a nod to using bread flour in place of all-purpose if you prefer chewier bread.
Nutrition
Serving: 1 | Calories: 154kcal | Carbohydrates: 21g | Protein: 4g | Fat: 6g | Saturated Fat: 2g | Polyunsaturated Fat: 4g | Cholesterol: 43mg | Sodium: 272mg | Fiber: 1g | Sugar: 4g