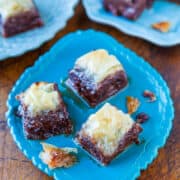
Nutella Chocolate Chip Baklava
I've always wanted to make baklava and this is my spin on traditional baklava. There are no nuts in this version, and instead, plenty of chocolate. In between flaky, buttery delicate layers of phyllo are thick smears of Nutella. Morsels of chocolate chips are sprinkled in and lend a firmer texture to an otherwise smooth, soft, and buttery-squishy treat. Even if you've never made Baklava before, you can tackle this one in minutes. Simply stacking layers of storebought dough, brushing them with butter, Nutella, and sprinkling on chocolate chips is all that's necessary. After baking, the baklava is drenched in a sugar-honey syrup. The baklava is extremely rich and decadent, sweet, and intensely chocolaty. Between the melted butter, Nutella, melted chocolate chips, and the sugar-honey syrup, it's one saucy, sticky, and extremely satisfying dessert. Note that although the active prep and baking time can be tackled in under an hour, the baklava must remained uncovered for at least 4 hours, or overnight, so plan accordingly.
Servings: 36
Calories: 131kcal
Ingredients
- 1- pound box phyllo dough about 18 large sheets
- ¾ cup unsalted butter 1 1/2 sticks, melted
- 2 cups Nutella
- 1 cup semi-sweet chocolate chips
- 1 cup water
- 1 cup granulated sugar
- ½ cup honey
Instructions
- Notes before beginning - Read the blog post in entirety in addition to what's included in the recipe section. I kept this shorter and more succinct, with greater explanations in the body of the blog post.
- When making this recipe, precision is not required; don't obsess or try to make it perfect. It's slippery, messy, and just do the best you can. Fold over the edges of phyllo dough as if creasing a piece of paper as needed to get phyllo to fit in the pan. With the butter, you can brush it with a pastry brush from cup to pan, or simply drizzle a tiny bit at a time straight from the measuring cup right into the pan to save time, then spread it around with the brush. With the Nutella, drizzling it straight from the jar and eyeballing it is what I did; microwave jar of Nutella for 10 seconds to help it drizzle easier if necessary.
- Begin by lining a 9-by-9-inch pan with aluminum foil; set aside. Open box of phyllo dough and using a scissors, cut the stack in half horizontally, creating two piles. Wrap one pile back up, you likely won't use it. The goal is to have the dough is approximately the same size as the pan, however it will still be a bit larger and this okay.
- In a glass measuring cup (easier) or microwave-safe bowl, melt the butter, about 1 minute on high power. Take 2 sheets of phyllo holding them as a pair, and brush one side with butter. Put the sheets in the pan, buttered side down. Brush the top of the sheets with butter. Add 2 more sheets as a pair and brush the top with butter. Add 2 more sheets and brush the top with butter. You now have 6 sheets in the pan, with layers of butter between them.
- Drizzle about 1/4 cup Nutella over the phyllo, spreading it gently with a knife to evenly distribute it. If it's not spreading easily, microwave the jar of Nutella for 10 seconds, which will help soften it for the next round. It's better to keep bald patches than to rip the phyllo.
- Sprinkle with about 1/4 cup chocolate chips. Add 2 more sheets of phyllo. Brush with butter.
- Add two more sheets of phyllo, drizzle 1/4 cup Nutella, sprinkle 1/4 cup chocolate chips. Top with two sheets of phyllo. Brush with butter.
- Add two more sheets of phyllo, drizzle 1/4 cup Nutella, sprinkle 1/4 cup chocolate chips. Top with two sheets of phyllo. Brush with butter.
- Keep repeating until you've used up your stack of dough, or are nearing the top of the pan.
- The final 6 layers at the top should be butter-only layers, just like when you made the crust. Six sheets, with butter in between them in 3 places. You may need to use a few pieces of dough from the second stack of phyllo. I used 4 sheets from the second stack.
- Using a very sharp knife, slice the phyllo diagonally, creating diamond shapes, 6 rows-by-6 rows. Starting at a corner, make a long slice, clear down to the opposite corner. That's the mid-line. Then slice in 3 rows on each side of it, for a total of 6 rows. After you get 6 rows, rotate the pan 180-degrees and do the same thing to create diamond shapes. Or slice into basic rectangles or preferred shape. Take your time and make sure to really slice through all the layers because these slice-marks are important.
- Bake at 350F for 25 to 35 minutes, or just until the top is golden. For me this was at 28-29 minutes. I was stood in the kitchen the whole time watching it and encourage you to not stray far and while the baklava bakes, make the sugar-honey syrup.
- Combine water, sugar, and honey in a large measuring cup or microwave-safe bowl and stir. Heat it until it just beings to boil and power off the microwave. For me this happened at just over 3 minutes, but stand and watch it because you don't want this boiling over in your microwave; set it aside. Alternatively you can bring this to a boil on the stovetop but I prefer the microwave.
- After the baklava comes out of the oven, slowly pour the syrup over it. As long as you're not overflowing your pan, you're fine; take short breaks to allow it to soak in as necessary. After syrup has all been poured, go back over your slice-marks, and re-slice. Really get in there and slice it well because this helps the syrup absorb and will aid in slicing and serving the baklava later.
- Let the pan stand, uncovered, for at least four hours, or overnight. I didn't touch my pan for about 14 hours and 80%+ of the syrup soaked in. The remaining is lost to the bottom of the pan, the foil, cutting board, countertop, or your hands. Store baklava in an airtight container at room temperature for up to 10 days. As the days passed, the syrup continued to soak in or evaporate, and the pooling mostly disappeared. I find the baklava gets better with time.
Nutrition
Serving: 1 | Calories: 131kcal | Carbohydrates: 19g | Protein: 1g | Fat: 6g | Saturated Fat: 3g | Polyunsaturated Fat: 2g | Cholesterol: 10mg | Sodium: 62mg | Fiber: 1g | Sugar: 12g