Caramel Corn Chocolate Chip Cookies
Caramel Corn is a favorite snack that I can devour by the handful. It's even better when it's baked into chocolate chip cookies. The cookie dough is sweetly perfumed with vanilla and brown sugar, and the addition of cornstarch helps the cookies stay soft and chewy, and they stay soft for days.The cookies are loaded to the max with caramel corn and chocolate chips, providing plenty of chewy texture. The cookies have a slight sweet-and-salty vibe from the caramel corn and biting into a softened and chewy piece of caramel corn that's engulfed in chocolate is my kind of cookie.
Servings: 20
Calories: 186kcal
Ingredients
- ½ cup unsalted butter softened
- ⅔ cup light brown sugar packed
- ½ cup granulated sugar
- 1 large egg room temperature
- 2 teaspoons vanilla extract
- 1 ¼ cups all-purpose flour
- 1 teaspoon cornstarch
- ½ teaspoon baking soda
- pinch salt optional and to taste (some caramel corn is already well-salted, something to consider before salting the dough)
- 3 cups caramel corn
- 1 cup semi-sweet chocolate chips
Instructions
- To the bowl of a stand mixer fitted with the paddle attachment, combine the butter, sugars, egg, vanilla, and beat on medium-high to high speed to cream them. Beat until light and fluffy, about 5 minutes, stopping to scrape down the sides of the bowl as necessary. Add the flour, cornstarch, optional salt, and beat to just incorporate; don't overmix. Add the caramel corn, chocolate chips, and beat momentarily to incorporate or fold in by hand, making sure not to overmix and break the caramel corn.
- Using a medium cooking scoop (or use your hands and roll the dough into tightly packed balls), form mounds weighing 1.40 to 1.50 ounces each, about two heaping tablespoons (I made 20 mounds). Mounds will look large because the caramel corn bulks the dough without adding much mass. It will appear that there are more add-ins than dough and that it will all hardly hold; this is normal and okay. Use your hands to press the add-ins into the dough, firmly squeezing the mounds together in your hands and rolling them between your palms as necessary to get everything to stick together.
- Slightly flatten the mounds so they don't stay too domed and puffed while baking, just don't over-flatten. Place them on a large plate, cover with plastic wrap, and place in the refrigerator to chill for at least 2 hours, or up to 5 days, before baking.
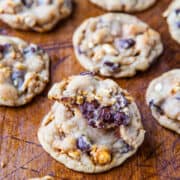
- Preheat oven to 350F, line 2 baking sheets with Silpat Non-Stick Baking Mats, and place dough on mounds, spaced 2 inches apart (8 per tray). Bake for 8 to10 minutes, until edges are set and tops are barely set, even if pale, glossy, and slightly underbaked in the center. Watch them closely after 7 minutes and I recommend not baking longer than 10 minutes, and erring on the lower end of the baking range. Cookies firm up as they cool, and baking too long will results in cookies that become too crisp and hard, or have overly browned caramel corn pieces or undersides (The cookies shown in the photos were baked for 8 to 9 minutes depending on the batch, with trays rotated at the 4-minute mark, and have chewy edges, soft centers, and gooey chocolate).
- Allow cookies to cool on baking sheets for 5 to 10 minutes before removing and transferring to a rack to finish cooling. Store cookies in an airtight container at room temperature for up to 1 week, or in the freezer for up to 3 months. Alternatively, unbaked cookie dough can be stored in an airtight container in the refrigerator for up to 5 days, so consider baking only as many cookies as desired and save the remaining dough to be baked in the future when desired.
- Adapted from Chocolate Chip and Chunk Cookies and Sugar-Doodle Vanilla Cookies
Nutrition
Serving: 1 | Calories: 186kcal | Carbohydrates: 28g | Protein: 2g | Fat: 8g | Saturated Fat: 5g | Polyunsaturated Fat: 3g | Cholesterol: 22mg | Sodium: 58mg | Fiber: 1g | Sugar: 19g