Old-Fashioned Banana Pudding
This homemade banana pudding recipe is made with scratch vanilla pudding, ripe bananas, and Nilla Wafers. It’s EASY to assemble and SO GOOD!
Servings: 8
Calories: 184kcal
Ingredients
- ¾ cup granulated sugar
- ¼ cup all purpose flour
- pinch salt (optional and to taste)
- 2 cups 2% milk
- 1 tablespoon vanilla extract
- 3 large eggs
- about 50 Nilla Wafers divided (I prefer the Reduced Fat version; substitute with graham crackers if necessary)
- 3 to 4 large bananas sliced into 1/4-inch rounds (use ripe bananas not over-ripe, they’re too mushy)
- ¾ cup coarsely chopped Nilla Wafers for sprinkling (about 20-25 wafers)
Instructions
Make the pudding:
- Get everything you need out and ready before beginning because you’ll be busy whisking and read the recipe over, at least twice, in full.
- In a medium sauce pan combine the sugar, flour, optional pinch of salt, and pour the milk over it.
- Heat this together over medium heat until it begins to boil gently, whisking quite frequently so that pudding skin doesn’t form on the bottom of the pan. Keeping the heat at medium is advised because higher heat will likely cause the milky mixture to scorch. It took a good 15 minutes of the pot appearing to do absolutely nothing for my pudding to finally begin to barely boil because I was compulsively whisking.
- After you see the mixture boil, whisk continually for the next 2 to 4 minutes, or until the pudding has thickened. A transition comes when the pudding gets thicker by the stroke. Use your judgment and when you think the pudding has thickened up sufficiently, take it off the heat.
- Whisk in the vanilla; set aside.
- In a glass measuring cup, whisk together 3 eggs (using the same whisk is fine).
- Add about 1/4 cup of the hot pudding mixture to the eggs, whisking the whole time to temper the eggs so they don’t scramble.
- Slowly pour the contents of the measuring cup into the sauce pan, whisking the entire time so you don’t scramble the eggs.
- Return the pan to the stove, and cook over medium heat for about 2 to 4 minutes, whisking the whole time. This cooks the eggs. You’ll know when the pudding is done and you can take it off the heat. It will be thick, creamy, and will look like pudding. It thickens up as it cools so don’t over-cook it or it can get a little too firm. Take it off the heat; set aside, whisking every few minutes so skin doesn’t form.
Assemble the banana pudding:
- In an 8×8, 10×7, or similar sized pan (9×9 is too big) make one even flat layer of Nilla wafers, covering the entire base of the pan (about 24 wafers).
- Top with banana slices in an even flat layer, covering the wafers.
- Whisk pudding and pour half over the bananas, smoothing lightly with a spatula.
- Repeat the layers, making one flat layer of wafers, another layer of bananas, and top with remaining pudding, smoothing the top lightly with a spatula.
- Cover with plastic wrap and refrigerate the pudding for at least 4 hours, or overnight.
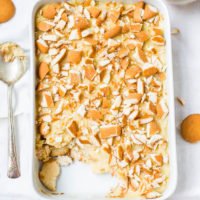
- Before serving, evenly sprinkle the chopped wafers over the pudding.
Video
Notes
Tips for Making Old-Fashioned Banana Pudding:
I used ripe bananas, but not over-ripe. Save those really freckled and speckled ones for banana bread. They will just disintegrate and biting into slightly firm banana slices is the goal.
I used Reduced Fat Nilla Wafers for two reasons. First, the obvious to save calories and fat when possible so you can eat more dessert. Secondly, the Reduced Fat variety are firmer, crunchier, and don't turn to mush as easily, an advantage here.
If desired, you can top this homemade banana pudding with whipped cream as well as crushed Nilla Wafers. Make it however you grew up eating it!
Storage:
Pudding will keep airtight in the refrigerator for up to 4 days. The banana slices don’t turn brown, although the wafers do continue soften as time passes.
Nutrition
Serving: 1serving | Calories: 184kcal | Carbohydrates: 35g | Protein: 5g | Fat: 3g | Saturated Fat: 1g | Polyunsaturated Fat: 0.4g | Monounsaturated Fat: 1g | Trans Fat: 0.1g | Cholesterol: 66mg | Sodium: 52mg | Potassium: 271mg | Fiber: 1g | Sugar: 27g | Vitamin A: 178IU | Vitamin C: 4mg | Calcium: 83mg | Iron: 1mg