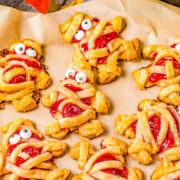
Mummy Halloween Hand Pies
A FUN and EASY Halloween treat that kids and adults alike both love! Buttery flakey pie crust with tangy-sweet cherry pie filling give great flavor to these festive and whimsical little goodies! Use store bought pie crust to save time and they're ready in 45 minutes. These little mummies will be the hit of your Halloween party!
Servings: 14
Calories: 145kcal
Ingredients
- 2 refrigerated pie crusts or homemade scratch pie crust, cold
- ⅔ cup cherry pie filling or your favorite flavor. divided
- 1 large egg lightly beaten
- ¼ cup granulated or turbinado sugar divided
- decorative candy eyes optional
Instructions
- Preheat oven to 350F and line one or two baking sheets with parchment paper; set aside. Depending on the size of your mummies will dictate if you need one or two baking sheets; they expand a bit while baking but not too much.
- On a clean work surface such as your kitchen countertop, unroll one of the refrigerated pie crusts (or scratch pie crust). Tip - Lightly flour your counter if you notice the crust wanting to stick.*
- Using a gingerbread men cookie cutter, cut out as many mummies as you can, and transfer them to the prepared baking sheets.* (See Notes)
- Add about 1 teaspoon of pie filling to the center of each mummy. I like to use 1 cherry plus a little of the sauce. If you're making larger mummies, use a bit more.
- Unroll the second sheet of pie crust, and using a pizza cutter (easiest I think) or a sharp knife, slice 1/8th-inch strips which are now the mummy wraps.** (See Notes)
- Trim the strips as needed to cover over the middle portion of the mummies as well as head area if desired. Make an X or two X's worth of mummy wrap, or whatever looks to be visually correct given the size of your cutouts.
- Then dip your finger in water and gently wet around the edges of the mummies.
- Then place the mummy strips over the mummies. Repeat as desired.
- Gently press the edges of the mummy wrap to seal.
- Evenly and lightly brush with egg.
- Evenly sprinkle with the sugar.
- Bake for about 20 minutes, or until lightly golden browned. Depending on the size of your mummies, baking times will vary so keep an eye on them. I recommend rotating your baking sheet one time midway through baking.
- Optionally (but recommended) immediately after baking if you're adding the decorative candy eyes, do so right away. The carryover and residual heat will help "glue" the eyes down and help them to adhere so they aren't as prone to falling off later.
- Serve mummies as soon as they're cool enough to eat.
Notes
*If using a small cutter, you'll yield about 14 mummies; and with a large about 6. Baking time will vary based on the size of the mummies.
**When working with the pie crust, keep it refrigerated or as chilled as possible because not only will it be easier to work with, cut out into shapes and strips, the finished mummies will have a nicer, lighter, flakier texture. Cold pie crust is always the way to go and is best.
Storage: Mummies will keep airtight at room temp for up to 5 days or in the fridge for up to 10 days, or in the freezer for up to 4 months. Note that as time passes, the crust will not have the same flakiness and crispness that it has when freshly baked.
Nutrition
Serving: 1 | Calories: 145kcal | Carbohydrates: 19g | Protein: 2g | Fat: 7g | Saturated Fat: 2g | Polyunsaturated Fat: 4g | Cholesterol: 13mg | Sodium: 110mg | Fiber: 1g | Sugar: 5g