
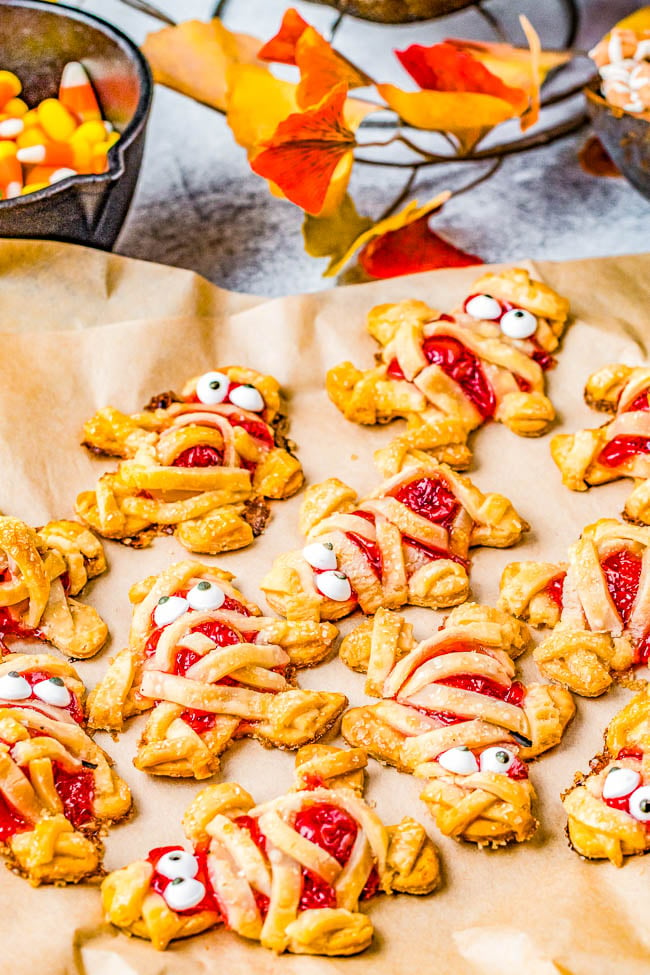
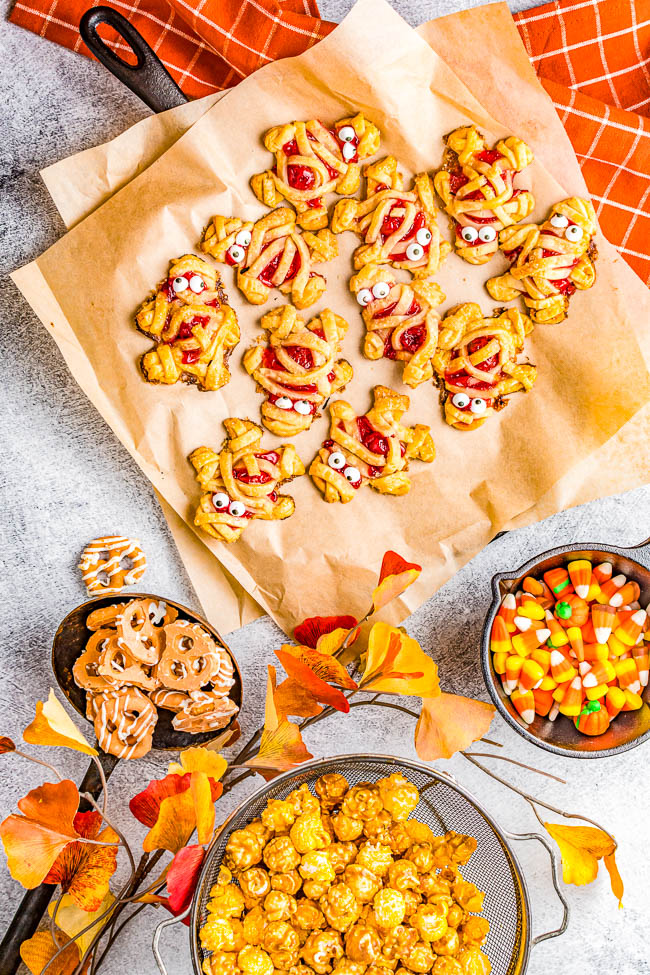
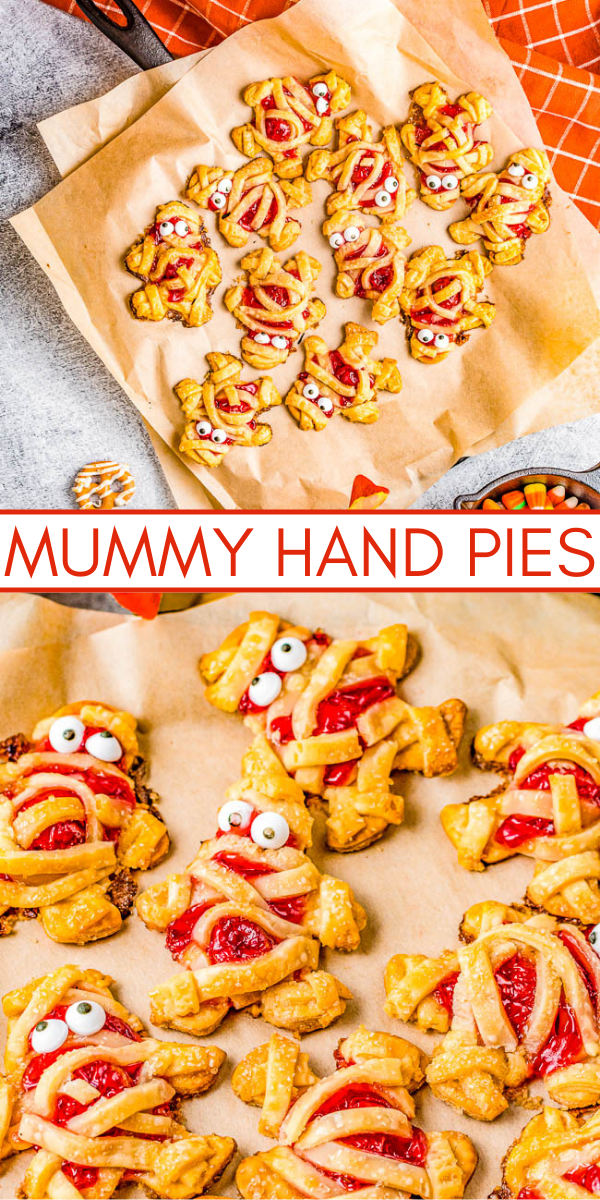
Halloween Hand Pies —👻🍒🥧 A FUN and EASY Halloween dessert for adults and kids alike! Buttery flakey pie crust with tangy-sweet cherry pie filling that gives great flavor to these festive and whimsical little goodies! Use store-bought pie crust to save time, and they’re ready in 45 minutes. These little mummies will be the hit of your Halloween party!
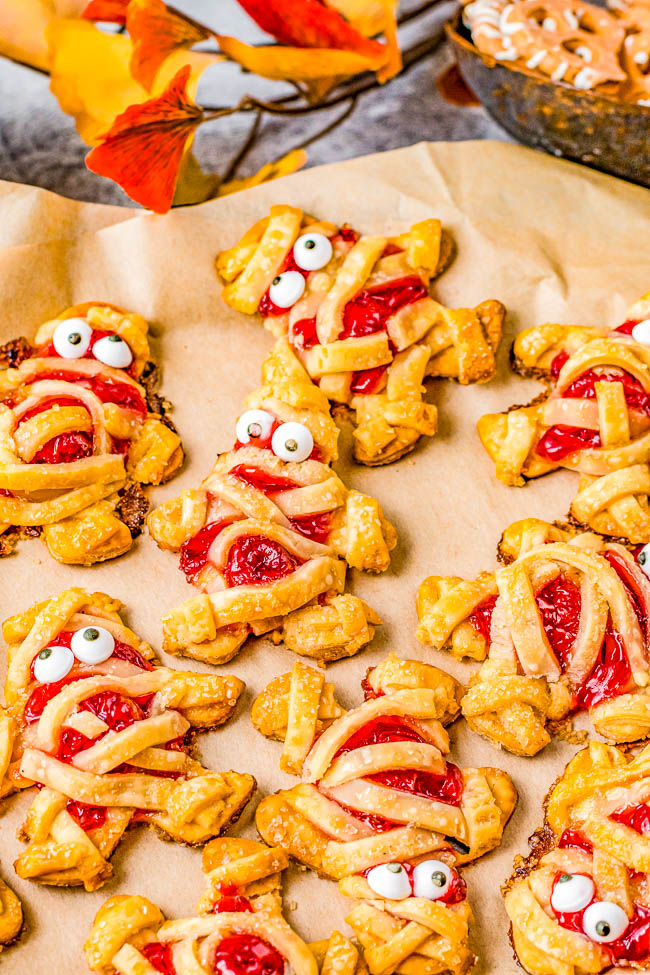
Table of Contents
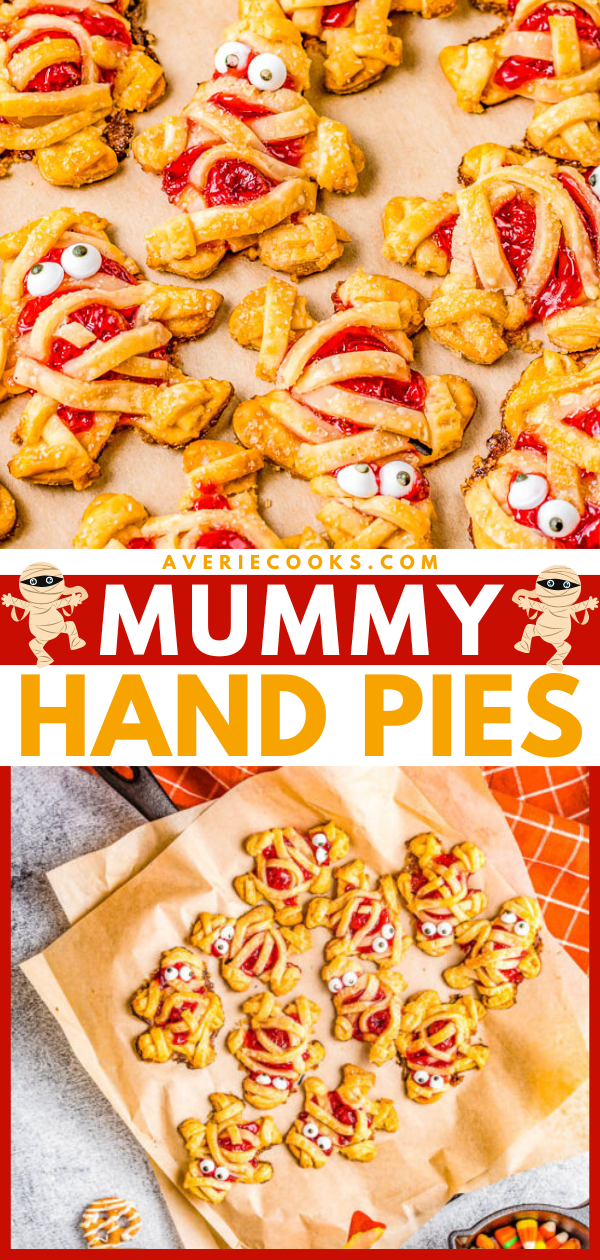
Halloween Mummy Hand Pies Recipe
The magic and thrill of Halloween is what I remember most as a kid about the holiday. I was excited every year for months before the big deal, carefully debating and planning out what my costume was going to be that year.
My dress-up days are behind me, but that won’t stop me from getting in the Halloween spirit with these festive little mummy hand pies.
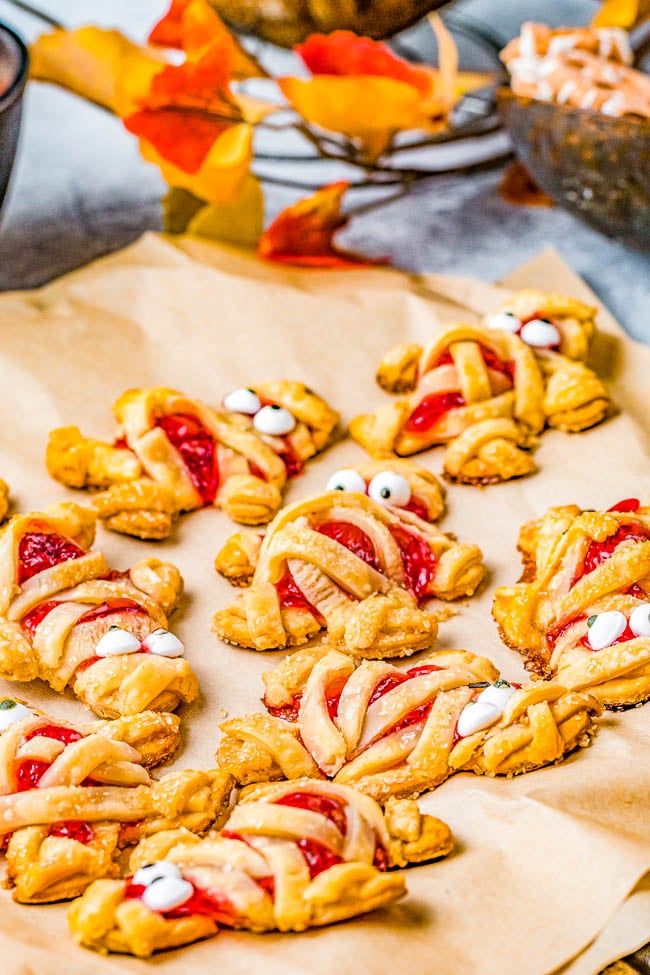
The cherry pie filling is tart yet sweet contrasted with the buttery pie crust. It’s light and flaky. Just think of these cherry mummy hand pies as cherry pie, in a much cuter format!
I am not a person who loves to decorate cupcakes with sky-high frosting or make complicated themed desserts.
So I promise you, these cherry hand pies are fast and easy. In fact, you’ll have them ready from start to finish, cut out, baked, and ready to devour in 45 minutes flat.
Looking For More Pie Recipes In Bar Form?
My apple pie bars feature a flaky, buttery crust that is topped with homemade apple pie filling and an oat crumble. Finished with caramel sauce, they’re always a hit.
And my salted caramel maple pecan pie bars are a quick, one-bowl recipe that encompasses all the flavors of classic pecan pie taken to a whole new level!
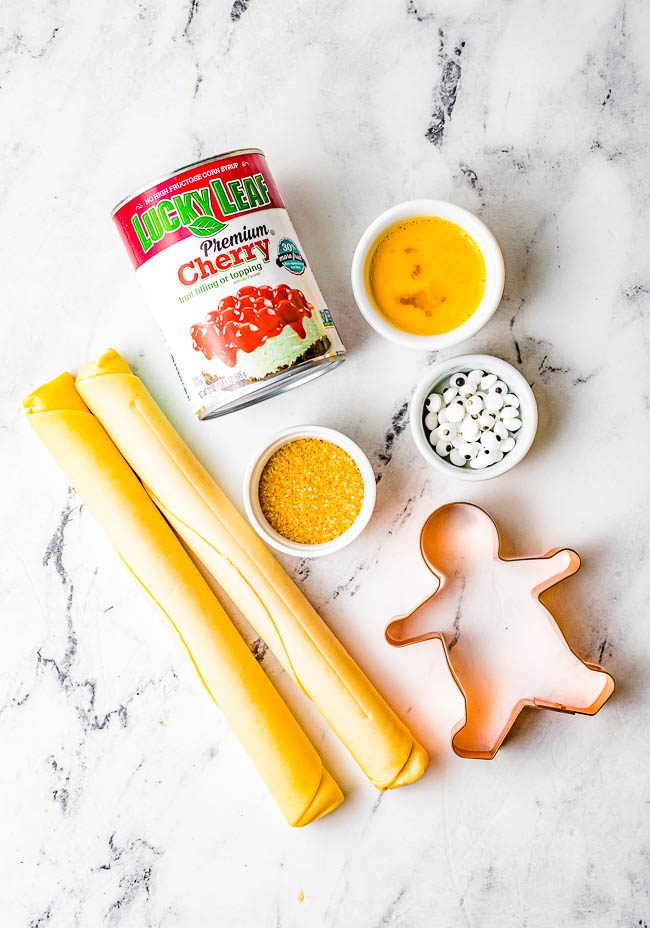
Ingredients in Halloween Hand Pies
To make these spook-tackular treats, you’ll only need four ingredients. I’m telling you, these are so easy!
To make this fun Halloween dessert, get out the following:
- Refrigerated pie crust (or homemade pie crust) – Keep the crust chilled until ready to use to keep it lighter and flakier once baked
- Pie filling – You can find cherry pie filling in the baking section of your local grocery store
- Egg – Let it come to room temperature before you begin, whisk in a small bowl
- Granulated sugar
- Decorative candy eyes, optional
Note: Scroll down to the recipe card section of the post for the ingredients with amounts included and for more complete directions.

How to Make Mummy Halloween Hand Pies
This truly is such an easy Halloween dessert that both adults and kids will adore! Here’s how the mummy hand pies are made:
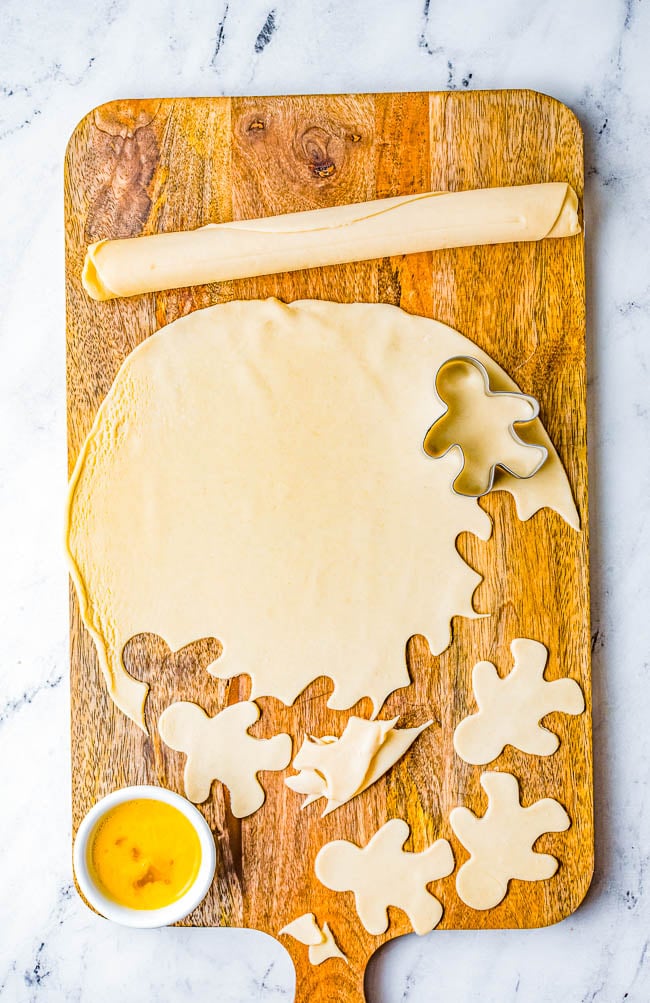
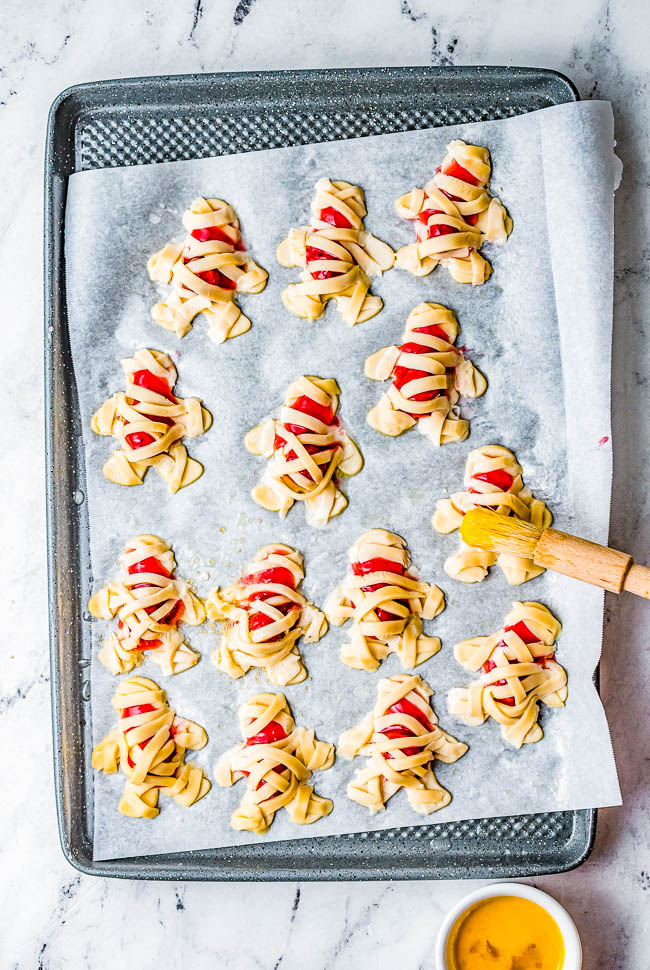
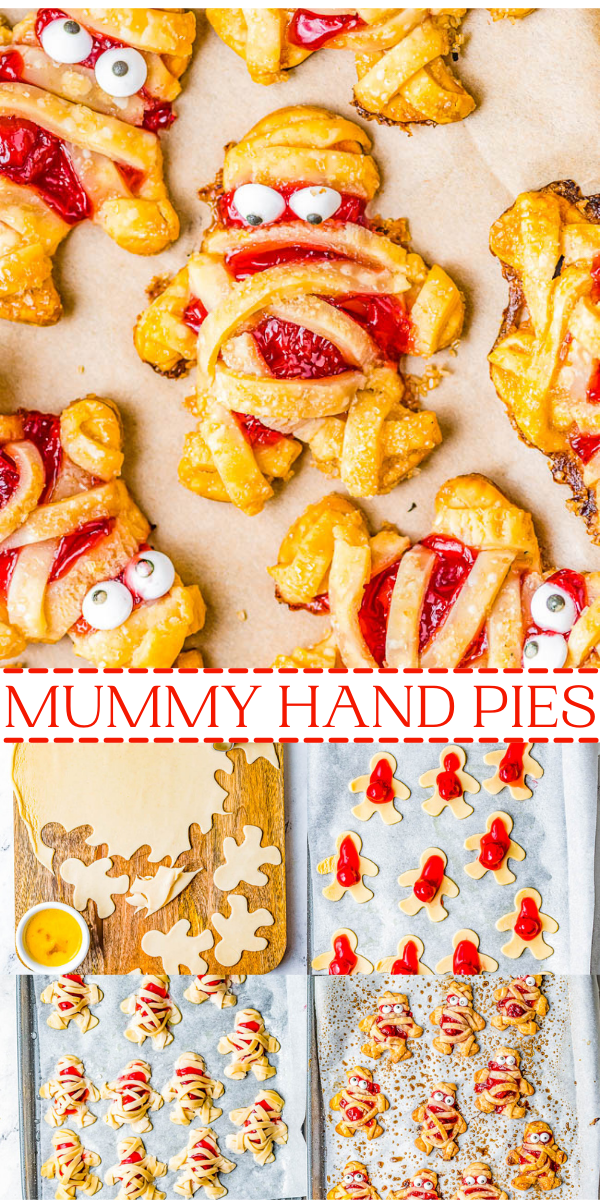
- Lightly flour a clean surface, unroll one pie crust, and use a gingerbread man cookie cutter to cut as many shapes out as you can. These gingerbread men will become your mummies.
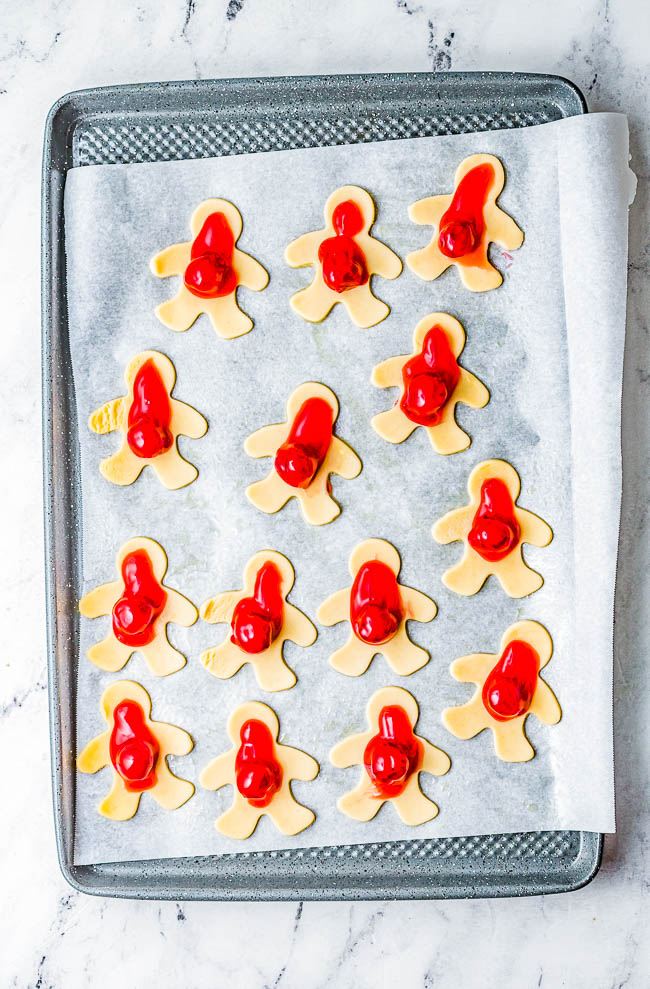
- Place them on the prepared baking sheet. Add a dollop of pie filling to the middle of each mummy.
- Unroll the second pie crust, and cut thin strips which will be used as mummy wrap. Dip your finger in water, and wet around the edges of each mummy. Then, place the mummy strips gently over the pie filling, and gently press to seal or use a fork to crimp the edges of your mummy wrap.
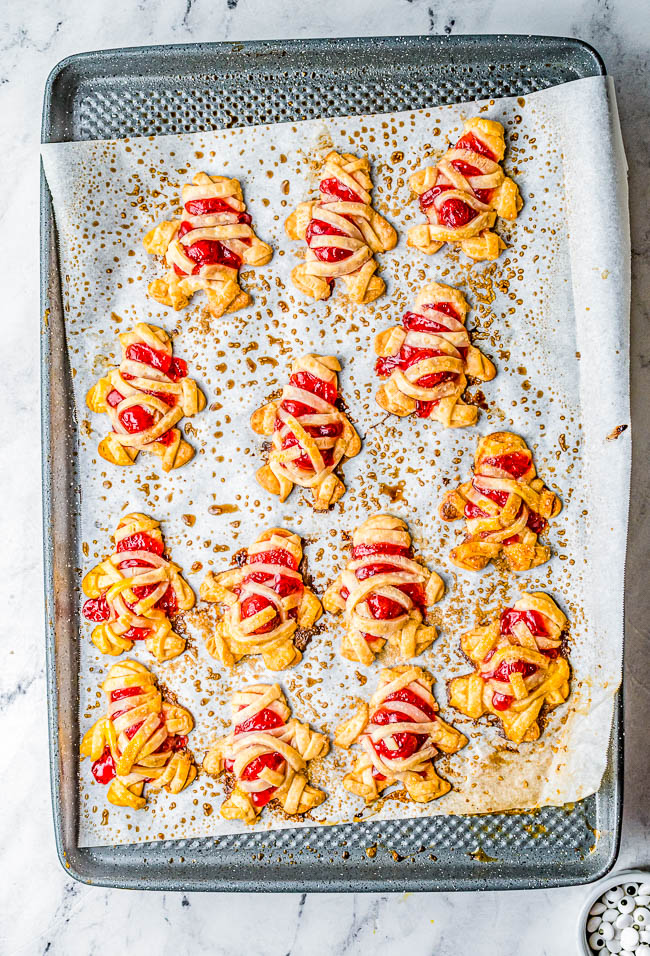
- Brush the tops of the pastry with egg wash, sprinkle with sugar, and bake for about 20 minutes on a baking sheet with parchment paper until golden brown.
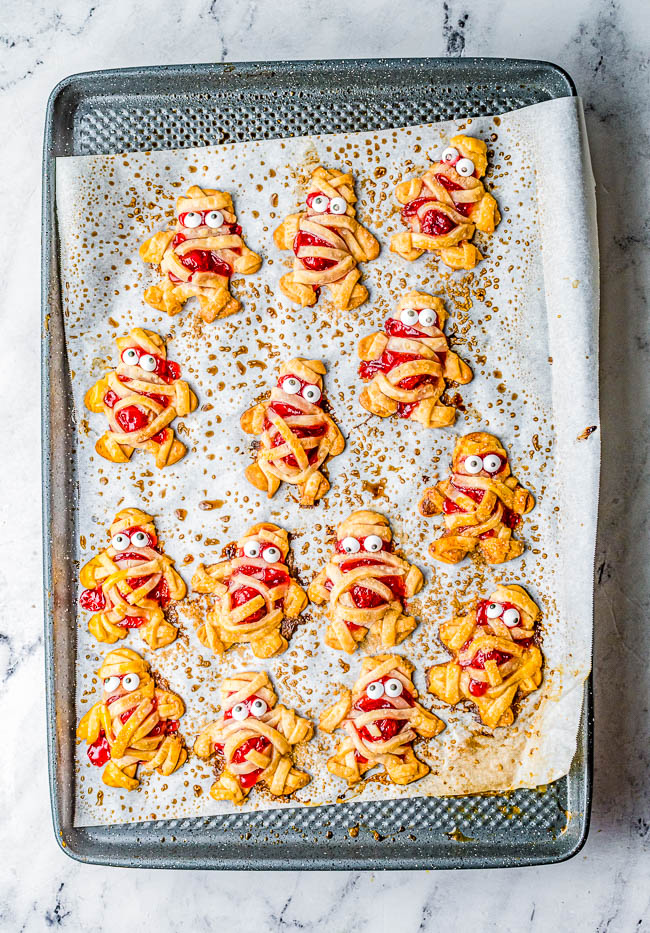
- If you’re adding the decorative candy eyes, add them immediately after you take them out of the oven. The residual heat will help seal and “glue” the eyes down so they don’t come off as easily.
Tip: You can do whatever pattern you like with the strips of pie dough. Choose whatever pattern is easy to maneuver. I make Xs across the midsections with strips that I pre-trim, lay down, and then seal gently.
Storage
Store leftover cooked and cooled hand pies wrapped in plastic wrap or transferred to an airtight container at room temperature for up to 5 days or in the fridge for up to 1 week.
You can also freeze leftovers for up to 3 months. To thaw, place them in the refrigerator overnight.
Reheat in the microwave or oven just until warm. Be careful not to let them burn!
Recipe FAQs
I used store-bought refrigerated pie crust to keep these pies for Halloween as easy as possible.
However, if you’re feeling like you want to go homemade all the way, then make up a batch of my Flaky All Butter Pie Crust and it will be the perfect amount of crust for this recipe since it makes two.
Of course! I used cherry pie filling because I tend to keep it on hand. Plus, it’s festive for Halloween with the whole red “scary look” although these are definitely more cute than scary. However, feel free to use whatever flavor of pie filling you’d like. Apple hand pies and pumpkin hand pies are other popular options!
You can also substitute pie filling with berry jam such as raspberry, strawberry, or blueberry. Or, use pumpkin puree with spices like cloves, nutmeg, cinnamon, etc. to create a pumpkin pie hand pie recipe.
Very easily! Simply use your favorite store-bought gluten-free pie crust and check that your cherry pie filling is also gluten-free.
Yep! Again, make sure your store-bought pie filling and pie crust are both vegan and you’re good to go.
I suggest checking Amazon for gingerbread men cutters. You can pick up a set with multiple shapes and sizes very inexpensively. Just think, you’ll be way ahead of the Christmas cutout cookie game!
Depending on the size of your cookie cutter you’ll need to adjust and watch the baking time in the oven. Obviously small mummies will bake more rapidly than larger ones.
Mummy Halloween Hand Pies
Equipment
- 1-2 Baking Sheets
- 1 Gingerbread Man Cookie Cutter
Ingredients
- 2 refrigerated pie crusts, or homemade scratch pie crust, cold
- ⅔ cup cherry pie filling, or your favorite flavor. divided
- 1 large egg, lightly beaten
- ¼ cup granulated or turbinado sugar, divided
- decorative candy eyes, optional
Instructions
- Preheat oven to 350F and line one or two baking sheets with parchment paper; set aside. Depending on the size of your mummies will dictate if you need one or two baking sheets; they expand a bit while baking but not too much.
- On a clean work surface such as your kitchen countertop, unroll one of the refrigerated pie crusts (or scratch pie crust). Tip – Lightly flour your counter if you notice the crust wanting to stick.*
- Using a gingerbread men cookie cutter, cut out as many mummies as you can, and transfer them to the prepared baking sheets.* (See Notes)
- Add about 1 teaspoon of pie filling to the center of each mummy. I like to use 1 cherry plus a little of the sauce. If you're making larger mummies, use a bit more.
- Unroll the second sheet of pie crust, and using a pizza cutter (easiest I think) or a sharp knife, slice 1/8th-inch strips which are now the mummy wraps.** (See Notes)
- Trim the strips as needed to cover over the middle portion of the mummies as well as head area if desired. Make an X or two X's worth of mummy wrap, or whatever looks to be visually correct given the size of your cutouts.
- Then dip your finger in water and gently wet around the edges of the mummies.
- Then place the mummy strips over the mummies. Repeat as desired.
- Gently press the edges of the mummy wrap to seal.
- Evenly and lightly brush with egg.
- Evenly sprinkle with the sugar.
- Bake for about 20 minutes, or until lightly golden browned. Depending on the size of your mummies, baking times will vary so keep an eye on them. I recommend rotating your baking sheet one time midway through baking.
- Optionally (but recommended) immediately after baking if you're adding the decorative candy eyes, do so right away. The carryover and residual heat will help "glue" the eyes down and help them to adhere so they aren't as prone to falling off later.
- Serve mummies as soon as they're cool enough to eat.
Notes
Nutrition
Nutrition information is automatically calculated, so should only be used as an approximation.
©averiecooks.com. Content and photographs are copyright protected. Sharing of this recipe is both encouraged and appreciated. Copying and/or pasting full recipes to any social media is strictly prohibited.
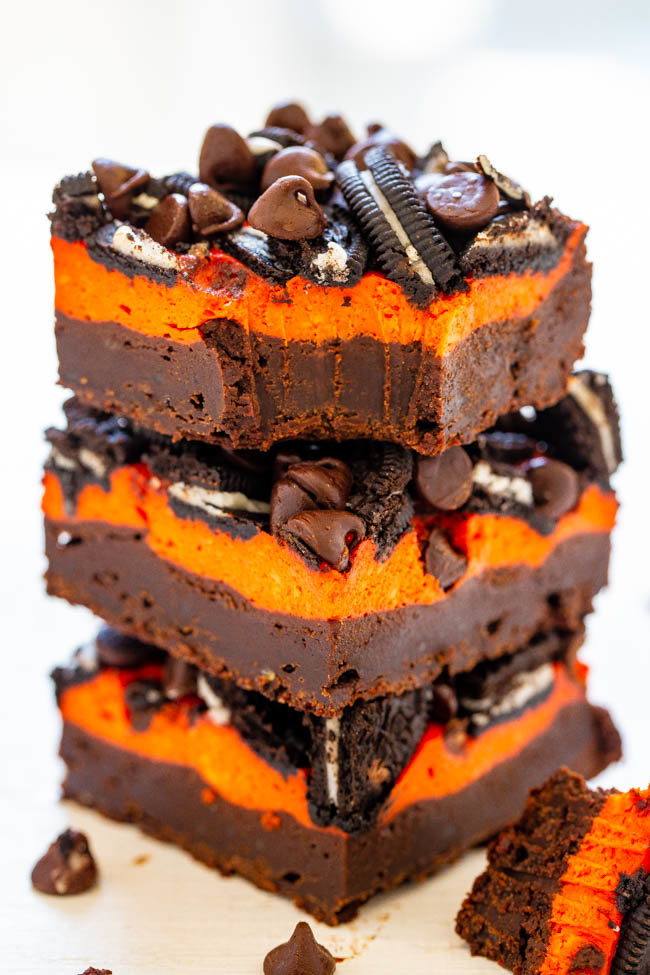
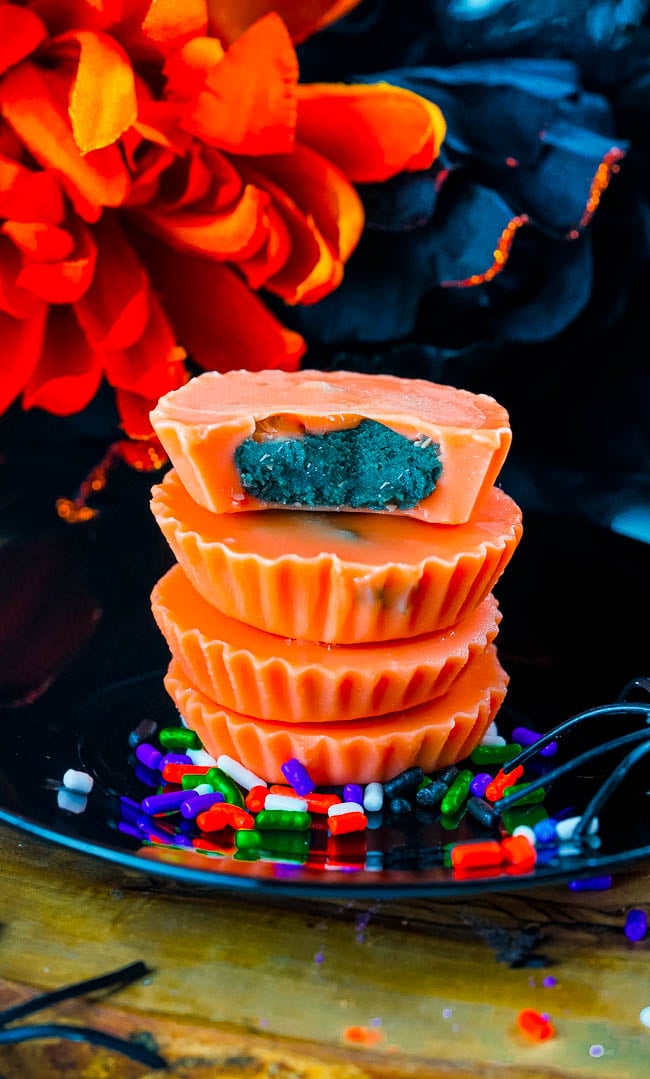
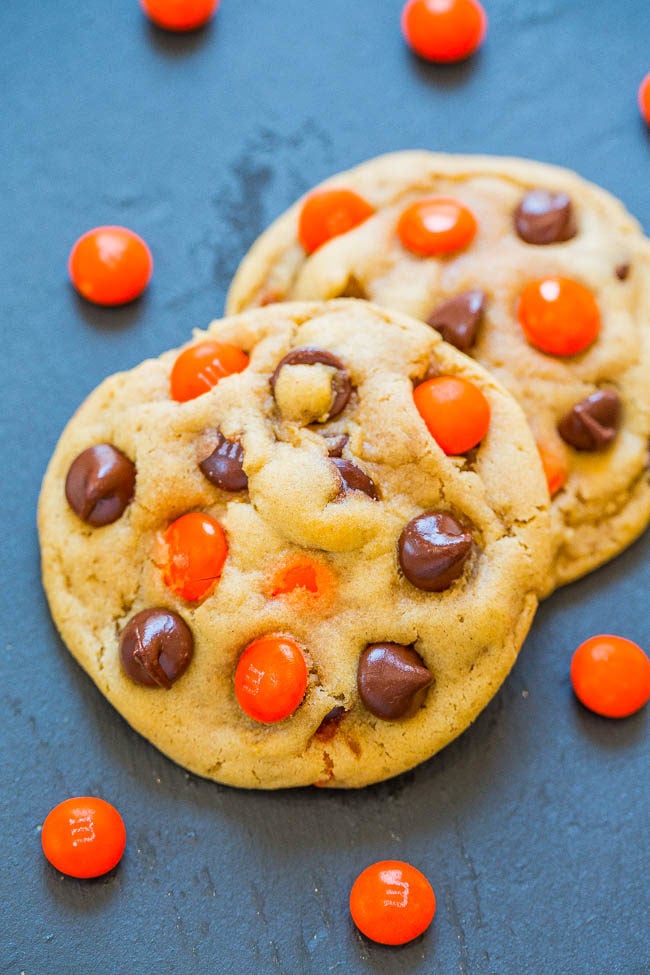
More Easy Halloween Desserts:
Loaded Halloween Cream Cheese Brownies – Ultra fudgy, rich brownies topped with a layer of orange cream cheese, sandwich cookies, and chocolate chips!
Halloween Peanut Butter Cups — Learn how to make white chocolate peanut butter cups with this NO-BAKE 5-INGREDIENT RECIPE! With festive Halloween colors, they’re sure to be a hit with everyone from kids to adults alike!
Chocolate Chip M&M’s Halloween Cookies — Super soft, perfectly chewy, BROWNED BUTTER cookies that are LOADED with M&M’s and chocolate chips!
White Chocolate Candy Corn Cookies — These Halloween cookies are PACKED with candy corn and white chocolate chips. They’re easy to make and are always a hit with the kids!

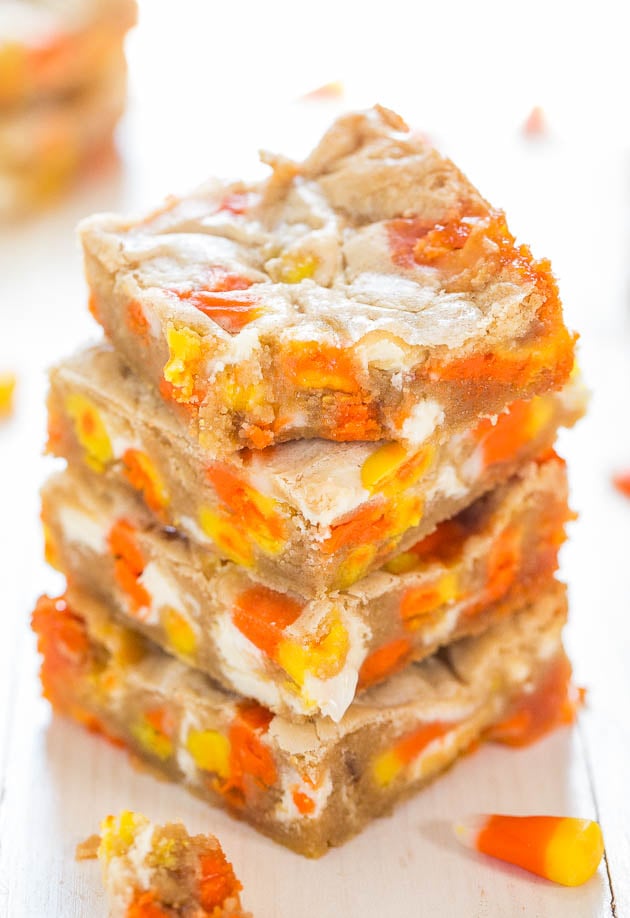
Candy Corn and White Chocolate Blondies — The blondies are super soft, slightly chewy, and buttery. The candy corn stays chewy after it’s baked and the contrast of the dense, moist, tender bars against the chewy candy corn is great.
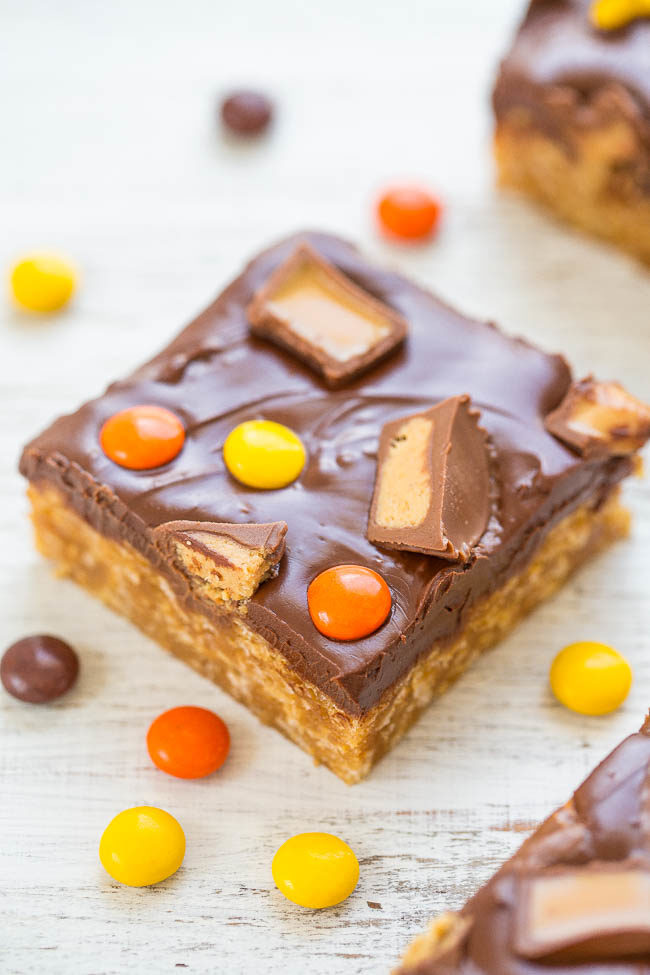
Chocolate Peanut Butter Candy Bars — The bars are no-bake, easy, loaded with bold peanut butter flavor, and plenty of chocolate. There’s both a layer of melted chocolate and assorted candy bar pieces adorn the top.

great
This recipe looks really great! I don’t have any refrigerated or crust and it’s difficult for me to make homemade (severe arthritis in my hands). Do you think it would work with puff pastry or would they become misshapen? Thank you for your blog and your site! I have made a lot of your recipes and enjoyed them.
Penny
Puff pastry is totally different than pie crust. I recommend pie crust for best results.