
The Best Pumpkin Cinnamon Rolls — 🎃😋🍂 Super soft, fluffy pumpkin spice cinnamon rolls topped with a cream cheese glaze! This is an EASY recipe that can be made as overnight cinnamon rolls or baked right away! Move over, Cinnabon, these are better!!
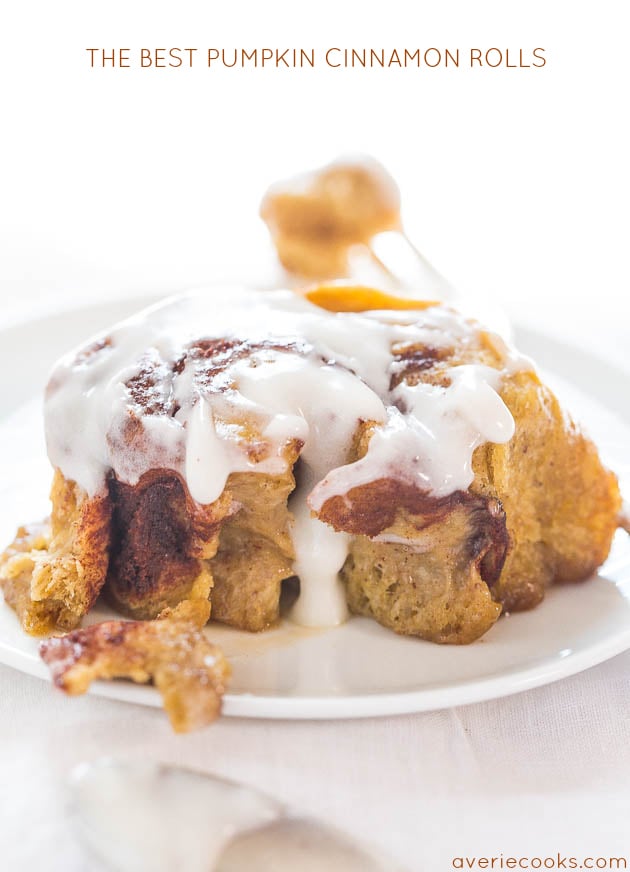
Table of Contents
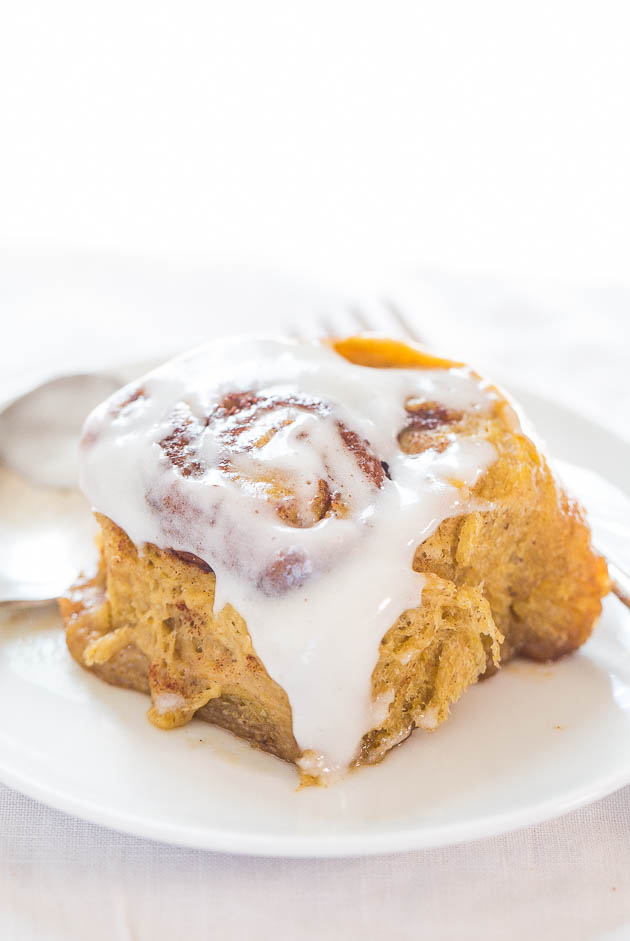
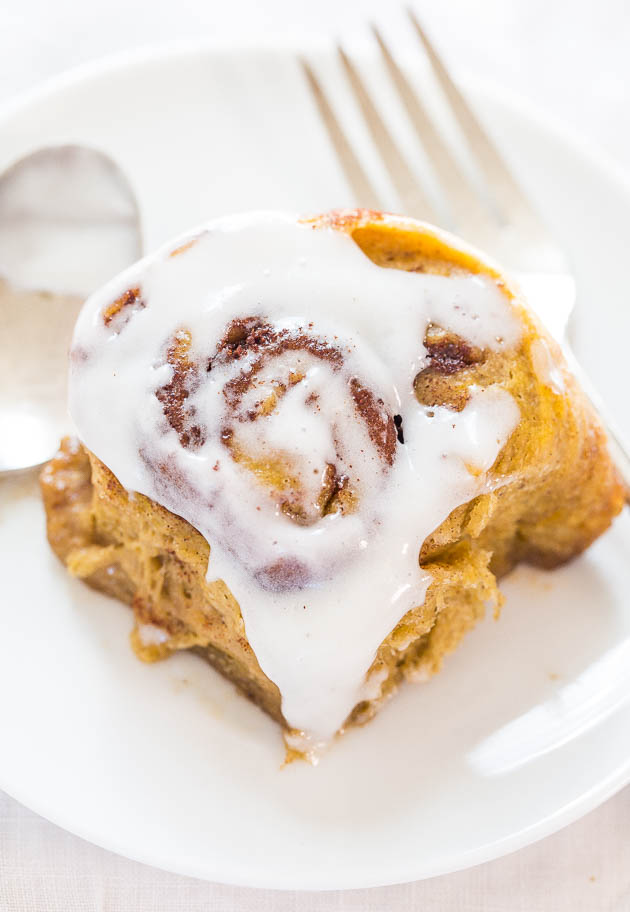
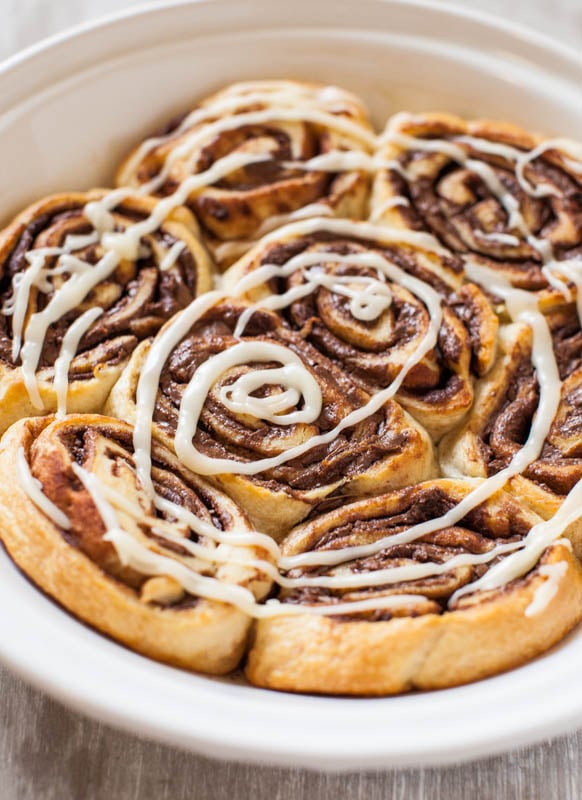
These are the best pumpkin cinnamon rolls I’ve ever made! I prefer these over Cinnabon, and that’s a big statement coming from a former Cinnabon junkie.
They’re soft, light, fluffy and there’s just enough pumpkin flavor to notice, but not so much that it overwhelms the inherent beauty of classic cinnamon rolls. Topped with cream cheese glaze, they’re totally irresistible.
I used my favorite yeast roll recipe as the jumping off point and worked in pumpkin puree, pumpkin pie spice, and plenty of cinnamon and brown sugar for these pumpkin cinnamon rolls.
The glaze is a simple glaze of cream cheese, confectioners’ sugar, and a splash of cream. It makes more than the average person may want on their rolls, but it keeps for weeks in the fridge. I’m a dip, glaze, and frosting-aholic, and can never have too much. I keep a little cup on the side of my plate so I can double-dip.
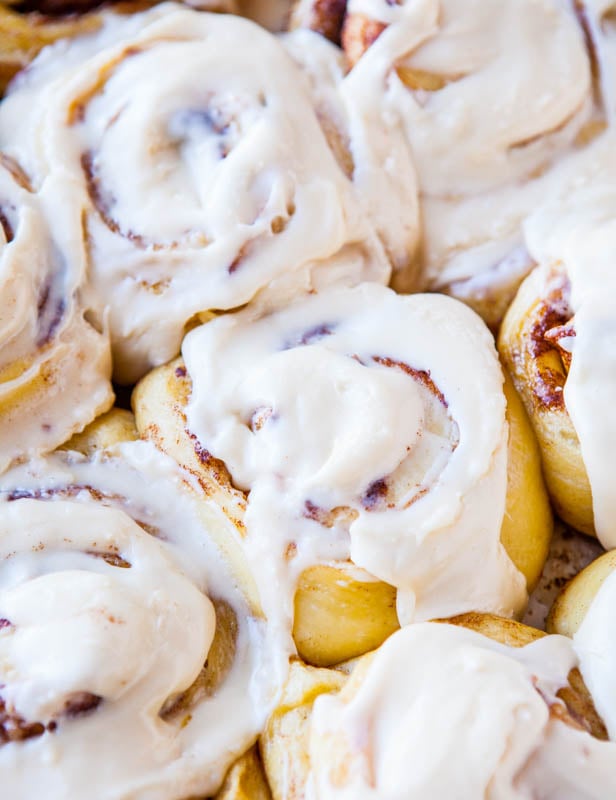
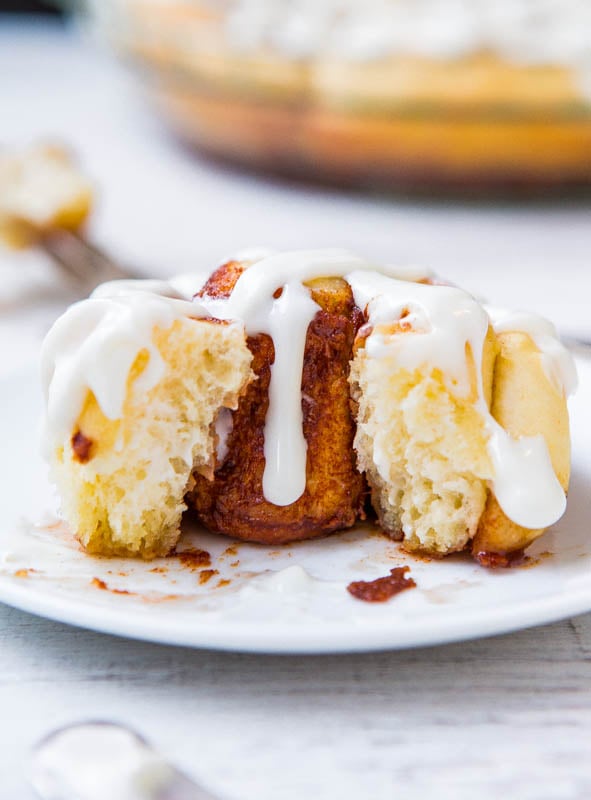
The glaze soaks into the nooks and crannies and adds even more moisture and softness. Total gooey, cinnamon-and-sugary, juicy perfection.
Ingredients for Pumpkin Cinnamon Rolls
Homemade cinnamon rolls require fairly few ingredients. Here’s what you’ll need for this pumpkin cinnamon rolls recipe:
- All-purpose flour
- Granulated sugar
- Pumpkin pie spice
- Instant dry yeast
- Salt
- Unsalted butter
- Buttermilk
- Pumpkin puree
- Egg
- Light brown sugar
- Cinnamon
- Cream cheese
- Confectioners’ sugar
- Half and half (or cream)
Note: Scroll down to the recipe card section of the post for the ingredients with amounts included and for more complete directions.
How to Make Pumpkin Cinnamon Rolls
I’ve given very detailed instructions in the recipe card below on how to make these pumpkin spice cinnamon rolls. Here’s a broad overview of the process:
- Make the cinnamon roll dough. See my tips in the recipe card on how to activate the yeast and make the dough.
- Let rise. Transfer dough to a greased mixing bowl, cover with a towel, and let rise at room temperature for about 2 hours or until it doubles in size.
- Roll out the dough. Once the dough has risen, roll it out to about 26 by 13 inches. Spread softened butter over the dough, then sprinkle with the brown sugar cinnamon mixture.
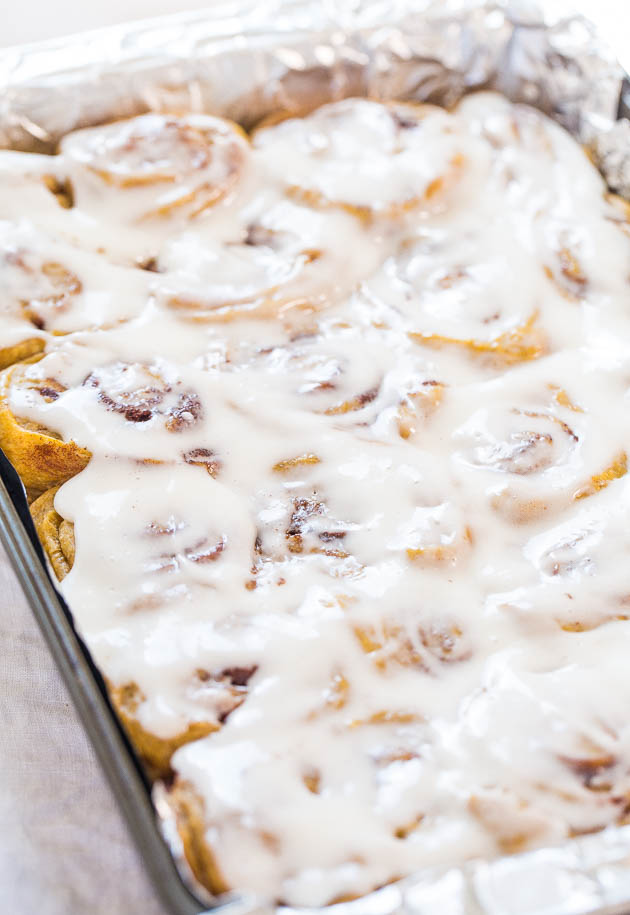
- Roll and slice the dough. Then place in a foil-lined 9×13-inch baking dish.
- Let the dough rise a second time.
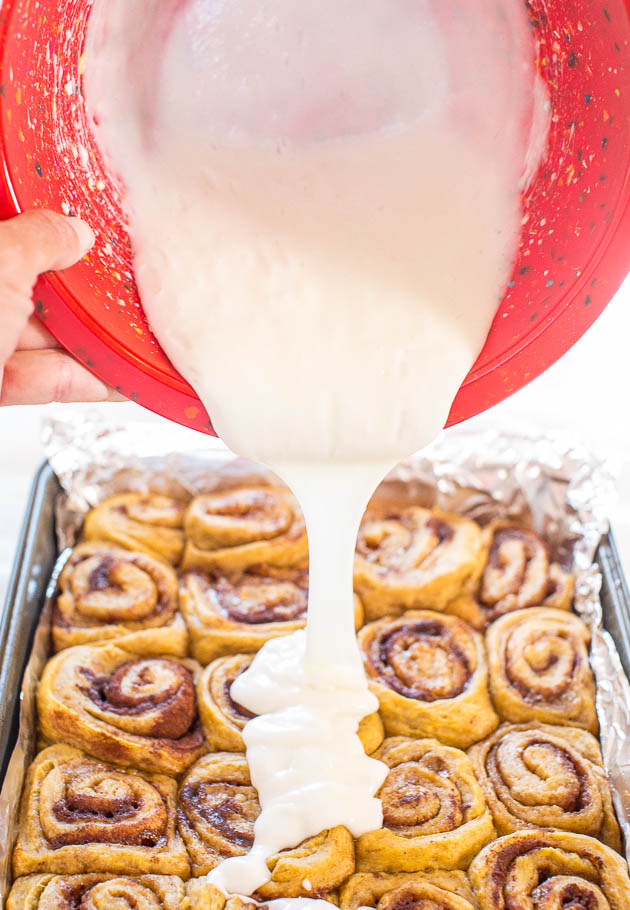
- Bake until golden brown. Top with cream cheese frosting while still warm.
Make-Ahead Instructions
There’s an option to make the pumpkin cinnamon rolls as overnight rolls (I’ve given detailed instructions on how to do so in the recipe card below).
Start the dough at night, roll and shape it, and refrigerate the coiled rolls until you’re ready to bake the next morning.
That way you don’t have to get up at 5am to have these ready with your first cup of coffee.
Recipe FAQs
The dough for this pumpkin cinnamon roll recipe is buttermilk-based. Although I’ve made non-buttermilk sweet rolls, for the softest, lightest, and most tender rolls, I swear by buttermilk. Between the buttermilk, butter, and egg, the dough rises beautifully and it’s my favorite dough base.
Check out my other Buttermilk Recipes if you’re looking for ways to use the rest of your buttermilk!
I use liquid regular buttermilk from Trader Joe’s but you can use powdered buttermilk or make your own by adding 1/2 tablespoon white vinegar to 1/2 cup 2% or whole milk.
Theoretically, yes. However, homemade pumpkin puree often contains more moisture than canned puree. To prevent the pumpkin spice cinnamon roll dough from being too wet, thoroughly blot the pumpkin puree to remove any excess moisture.
Of course! You can also work the dough by hand in a large mixing bowl using a wooden spoon and some elbow grease. I do NOT recommend using a handheld electric mixer in place of a stand mixer, as it likely won’t be powerful enough to handle the dough.
If you don’t have a 9×13-inch pan, you’ll need to mix and match smaller baking pans to fit all of the cinnamon rolls (two 8×8-inch pans would work perfectly, otherwise use what you have).
Whatever you do, do NOT attempt to squish all of the cinnamon rolls into a single, smaller pan. The rolls will puff up, overflow, and you’ll have a mess on your hands.
To shape cinnamon rolls, you need to roll the dough into a long log. Then, use a knife to make small hash marks about 1 to 1 1/2 inches apart. Hash marks create less guesswork once you start slicing and things get messier and harder to eyeball where to slice — the hash marks are nice place-markers. Use plain, unwaxed dental floss to slice the rolls. I highly recommend slicing the rolls with floss, not knives. Floss does not squish or compact the log like knives do.


The Best Pumpkin Cinnamon Rolls
Ingredients
Dough
- 3 ¼ cups all-purpose flour, or as needed
- ¼ cup granulated sugar
- 2 tablespoons pumpkin pie spice
- 2 ¼ teaspoons instant dry yeast, one 1/4-ounce packet, I use Red Star Platinum
- pinch salt, to taste
- ½ cup unsalted butter, melted (1 stick)
- ½ cup buttermilk
- ½ cup pumpkin puree
- 1 large egg, lightly whisked
Filling
- 6 tablespoons unsalted butter, 3/4 of 1 stick, very soft – let it sit out while dough rises
- 1 to 1 ¼ cups light brown sugar, packed
- 2 + tablespoons cinnamon, I used 3+
Cream Cheese Glaze
- 4 ounces brick-style cream cheese, lite is okay, softened – let it sit out on the second rise or while rolls bake
- 2 cups confectioners’ sugar
- pinch salt, optional and to taste (helps balance the sweetness)
- about 3 to 4 tablespoons half-and-half or cream, or as needed for consistency
Instructions
Make the Dough:
- To the bowl of a stand mixer fitted with the dough hook (or use a large mixing bowl and wooden spoon and your hands), add 3 1/4 cups flour, sugar, pumpkin pie spice, yeast, salt; set aside.
- In 2-cup glass measuring cup or microwave-safe bowl, and the butter and heat to melt, about 1 minute on high power.
- Add buttermilk and pumpkin to melted butter and warm to temperature, about 45 seconds on high power in the microwave. If the milk separates or gets a little funny looking after being warmed, whisk it to smooth it out. ** (see note below)
- Add butter-buttermilk-pumpkin mixture to the dry ingredients in mixing bowl.
- In a small bowl, crack and lightly whisk the egg, and add egg to mixing bowl.
- Turn mixer on low speed and allow it to knead dough for about 7 minutes (about 7 to 10 minutes by hand using a wooden spoon and then switching to your hands). 3 1/4 cups of flour and 7 minutes is perfect for me, but if after 5 minutes your dough is very sloppy, wet, and won’t come together, add up to 1/4 cup flour, or as needed until it does come together. However, the more flour added, the denser and heavier the rolls will be; wetter dough is preferred to overly dry. If dough is dry or crumbly, drizzle in buttermilk until it comes together.
- Remove dough from the mixing bowl, spray a large bowl with cooking spray, place the dough in the bowl, and flip it over once so it’s lightly oiled on both top and bottom.
- Cover bowl with plastic wrap (spray it with cooking spray in case dough rises high enough to touch it) and place bowl in a warm, draft-free place to rise for about 2 to 2 1/2 hours, or doubled in size. I keep my bowl inside a powered-off oven that I preheated for 1 minute to 400F, then it’s powered off. Do not, repeat do not, keep the oven on. The pre-heated, warm oven creates a nice 85F-ish environment, ideal for yeast. If your rising spot is cold, rising will likely take longer than 2 1/2 hours.
- While dough rises, line a 9×13-inch aluminum pan with aluminum foil, spray with cooking spray; set aside.
Rolling Out the Dough:
- After dough has doubled in size, punch it down.
- Turn dough out onto a Silpat or floured countertop. With a rolling pin, roll it out to about 26-by-13-inches. Use the 13-inch side of the 9-x13 pan to eyeball it, no need use a ruler.
For the Filling:
- Using a knife or spatula, evenly spread butter over dough, leaving a 1/2-inch bare margin.
- Evenly sprinkle the brown sugar and then the cinnamon over the top, and lightly pat it down with your fingertips to help it adhere.
Slicing the Dough:
- Starting with a long edge (the 26-inch side), roll the dough into a tightly wound log, with the seam side down.
- Using a knife, make small hash marks about 1 to 1 1/2 inches apart (yields 20 to 24 rolls); or make bigger rolls and yield 12 to 16. Hash marks create less guesswork once you start slicing and things get messier and harder to eyeball where to slice; the hash marks are nice place-markers.
- Use plain, unwaxed dental floss to slice the rolls. I highly recommend slicing the rolls with floss, not knives. Floss does not squish or compact the log like knives do. Visual here.
- Arrange the rolls in the prepared pan (I made 5 rows of 4 or 5 rolls across, and not all rows have same number of rolls; crowding is okay). Cover with plastic wrap.
- If Making Straight Through…
- Let rise in a warm, draft-free place until the rolls have nearly doubled in size, about 1 hour.
- If Making as Overnight Rolls…
- Don’t let rolls rise after they’ve been sliced and placed in covered pan. Place pan in refrigerator for up to 16 hours.
- Before baking, let the rolls rise at room temperature until they have nearly doubled in size, about 1 hour.
To Bake:
- For either version, bake at 375F for about 15 to 17 minutes, or until lightly golden on top and cooked through (ovens, dough, and climates vary and so will baking duration, but 1 to 2 minutes matters in this recipe). Watch rolls like a hawk and don’t overbake or they won’t taste nearly as good. At 15 1/2 minutes my rolls were barely done and on the doughy side but I prefer this because it reminds me of Cinnabons; if you like less doughy rolls, bake longer.
Make the Cream Cheese Glaze:
- In a medium bowl, add cream cheese, confectioners’ sugar, optional salt, 3 tablespoons cream, and whisk or beat with a handheld electric mixer until smooth and combined. Add cream as needed until desired consistency is reached.
- Evenly pour glaze over rolls, lightly spreading with a spatula as necessary.
- Serve immediately.
Notes
Nutrition
Nutrition information is automatically calculated, so should only be used as an approximation.
©averiecooks.com. Content and photographs are copyright protected. Sharing of this recipe is both encouraged and appreciated. Copying and/or pasting full recipes to any social media is strictly prohibited.
More Cinnamon Roll Recipes:
ALL OF MY CINNAMON ROLL RECIPES!
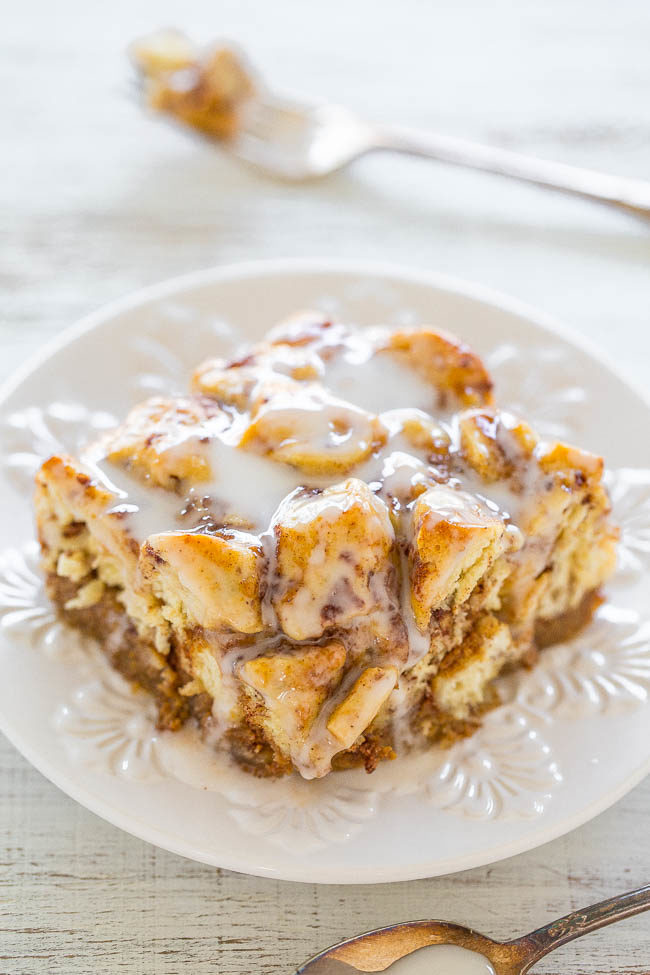
Pumpkin Cinnamon Roll Bake — Every bite tastes like the super SOFT, gooey CENTER of a cinnamon roll!! Spiked with pumpkin and flooded with icing, this EASY recipe is an automatic WINNER!!
Overnight Buttermilk Soft and Fluffy Cinnamon Rolls — For soft, fluffy, pillowy, perfect cinnamon rolls when you need a larger batch, it’s my go-to. Readers who’ve tried it write with high praise and success and it’s been pinned over 100k times.
One-Hour Homemade Cinnamon Rolls with Cream Cheese Frosting – Make soft, light, fluffy cinnamon rolls from scratch in 1 hour.
Nutella Cinnamon Rolls with Vanilla Glaze (Shortcut Recipe) – A can of crescent rolls never tasted so good as when they’re stuffed with Nutella and rolled up. Ready from start to finish in 15 minutes.
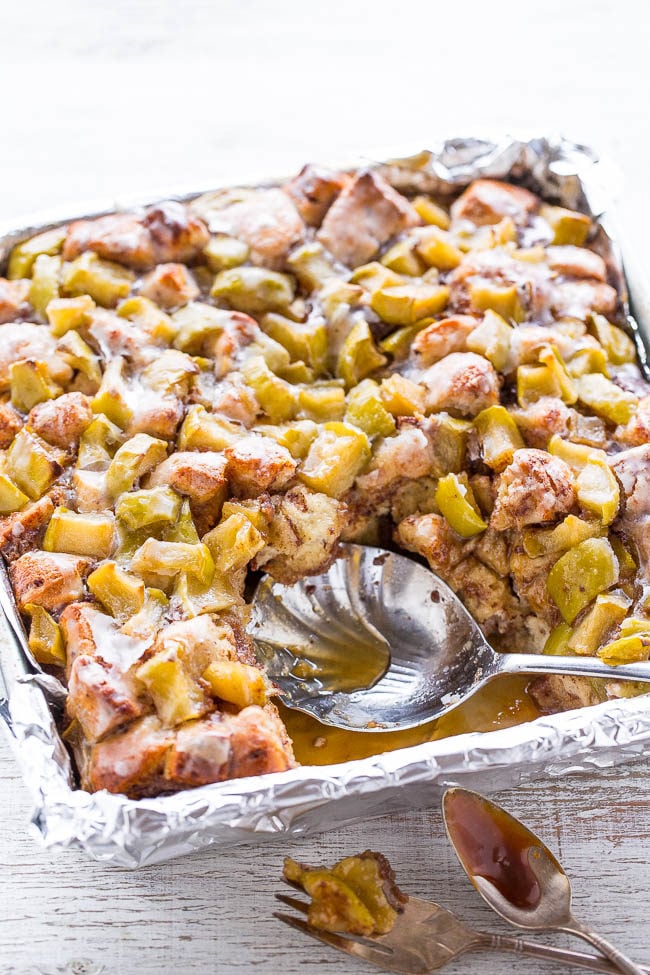
Caramel Apple Cinnamon Roll Bake — This cinnamon roll recipe with apples and caramel sauce is easy, ready in 30 minutes, and you don’t even have to make scratch cinnamon roll dough.
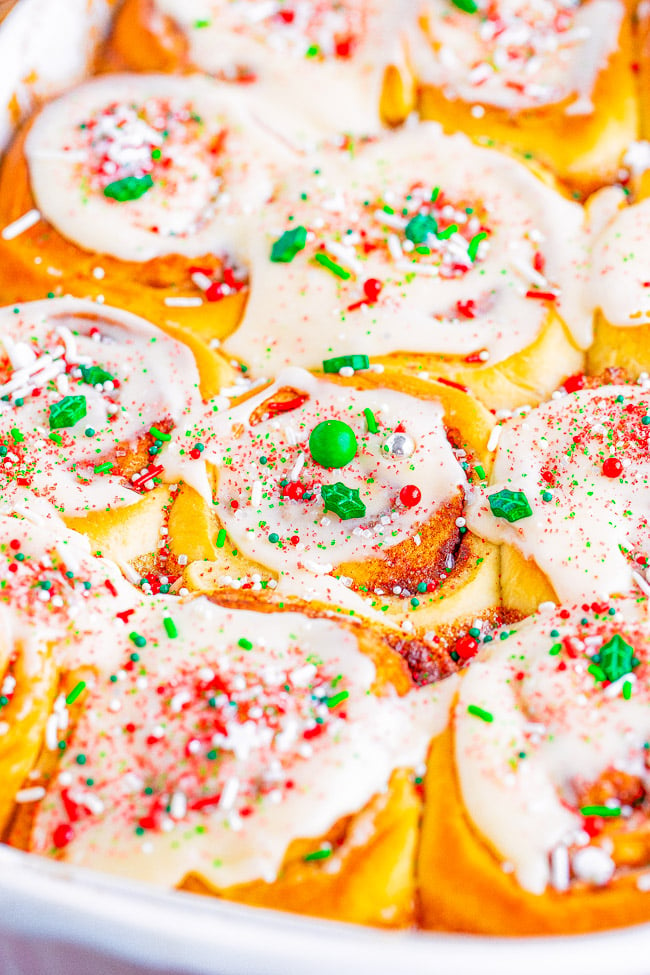
Overnight Eggnog Cinnamon Rolls — The SOFTEST and FLUFFIEST cinnamon rolls with an overnight MAKE-AHEAD option and eggnog frosting adds the perfect touch!! These would be a great make ahead Christmas breakfast option!
Cinnamon Roll Monkey Bread — 🧡🙌🏻😋 By taking advantage of refrigerated cinnamon roll dough, this monkey bread is FAST and so EASY! It has the flavor and texture of soft and fluffy cinnamon rolls but in bite-sized monkey bread pieces making it a favorite for kids and adults alike!

Chocolate Cinnamon Rolls — This ultra chocolaty twist on classic cinnamon rolls is made with doctored up chocolate cake mix and oodles of chocolate frosting!! Soft, tender, fluffy, and EASY!! Calling all chocaholics, these are for YOU!!

Birthday Cake Cinnamon Rolls — The softest, fluffiest, most tender cinnamon rolls stuffed with cinnamon-and-sugar and rainbow sprinkles! Topped with tangy cream cheese frosting and more sprinkles!

Originally posted September 26, 2014 and reposted October 28, 2022 with updated text. thou

Hi there!
Can you shed some light on the oven rising method? Do you preheat your oven til it reaches 400 then turn it off or do you actually just start preheating for only 1 min and then turn the oven off? One min just doesn’t seem like enough time yet 400 is way too high.
Thanks!
Preheat for 1 minute to 400F. Shut oven off. Slide dough in.
Otherwise just put it on the countertop; but it’ll take longer b/c it’s colder.
Just made these and have them in the refrigerator for the overnight method – bringing them for my staff pot luck tomorrow :) thanks for sharing the recipe! So excited and hoping they’ll be a big hit!
I’m sure they’ll be a huge hit! Who can say no to homemade cinnamon rolls!
I’ve made several yeast recipes before and they were disasters, so I was a bit skeptical to try another one. But this recipe sounded too good to pass up and when I read the detailed instructions, I thought I would give it a try. I bought the red star platinum yeast, King Arthur flour, and even a digital thermometer to check the temperature of the: 1) microwaved warm butter liquid and 2) oven prior to the first rise to make sure the temperature was not too warm.
The result: PHENOMENAL!!!! Thank you, thank you, thank you Averie for helping me make my FIRST ever successful yeast recipe!!!!! Your very detailed instructions turned this skeptic into a believer and my husband couldn’t believe his eyes when I told him everything was made from scratch. He was too busy devouring them! I shared the rolls with my neighbors, and they couldn’t stop eating them too! I cannot wait to try your other recipes and share your delicious food with others :)
Keep up the good work!!
Thanks for trying the recipe and I’m glad it came out great for you! I am so glad! And cinnamon rolls are not an ‘easy’ first time yeast recipe just because there’s rolling, there’s a filling, etc. It’s not like a simple dinner roll or loaf of bread so I am very happy FOR you! I think the combination of the right ingredients and tools and my detailed instructions and everything aligned!
hello. I tried the pumpkin cinnamon roll recipe and followed the instructions for rising the dough in the over. I preheated the oven, turned off and placed the bowl in. The plastic wrap melted and the dough had actually started baking instead of rising. Any tips on what I did wrong? Thank you!
Wow, your oven sounds like it gets very hot, very quickly. In your case, I would simply let the dough rise on the countertop then because your oven sounds like it gets very hot in a hurry!
I’m making these tomorrow! But I think I’m going to add chocolate chips to mine! Thanks for this awesome recipe!
Sounds awesome, LMK how it goes!
Amazing post! I was wondering, would it be better if I was making these 2 days ahead of time to refrigerate or freeze the rolls until it’s time to bake? Thanks and love your site!
With this yeast recipe you really cannot let it sit 2 days without baking. There is an overnight option, which is as long as I would let it go before baking it off or the dough could ‘over-proof’, collapse, not recommended. I also don’t recommend freezing the unbaked dough.
That is a huge fallacy in your recipe. Why do you say in your recipe to preheat your oven to 400°?! That’s insane. I should have trusted my better judgement after reading through your recipe multiple times, as you suggested. Preheating the oven to 400° then turning it off and placing the dough inside is a recipe for disaster! The oven stays way too hot to entertaining a tender rise of dough. You could have worded it exactly as you did in your reply to my first comment. I would suggest rewording to say, “set your oven to 100° then turn it off and place your dough inside.” Leave the word 400° out of the discription as it caused me major confusion.
I really don’t think I could have been any clearer in how I wrote step 8: ….preheated for 1 minute to 400F, then it’s powered off. Do not, repeat do not, keep the oven on…
“Cover bowl with plasticwrap (spray it with cooking spray in case dough rises high enough to touch it) and place bowl in a warm, draft-free place to rise for about 2 to 2 1/2 hours, or doubled in size. I keep my bowl inside a powered-off oven that I preheated for 1 minute to 400F, then it’s powered off. Do not, repeat do not, keep the oven on. The pre-heated, warm oven creates a nice 85F-ish environment, ideal for yeast. If your rising spot is cold, rising will likely take longer than 2 1/2 hours.”
I’m sorry you were confused. Lots of people have had amazing success with this recipe, even first-time bread makers. Thanks for trying the recipe.
I think the confusion might have been the preposition “to” before the 400F which implies that the preheated temperature would be 400F. I have never had an oven that would preheat to 400F in just one minute. Did you mean preheat AT 400F for one minute which would warm the oven up nicely.
I used to rise my dough in a warm oven. It worked fine. Then I found if I tossed a cup of water in the empty dishwasher and put it on to heat for a few minutes, it created a moist, warm rising spot. It worked better. No, I run hot water into my sink to fill it half full, set a rack on top of the sink, put the dough in a covered bowl, cover it with a towel to trap the warmth under it and let it rise. It is perfect and I don’t forget about it because I can see it.
I followed instructions to a T! 400° is way too hot for the dough. I set it to 400° and turned it off, placed my dough inside and 2 hours later, the dough was runny (because it was starting to cook!) and an absolute mess! Was 400° a typo? I’m so sad, especially because I made 2 batches.
You’re literally supposed to put the pan inside the oven, turn the oven on for 1 minute and 1 minute only, and shut it off. That’s it. Just to create a nice warm and toasty place since most people’s kitchens are rather chilly this time of year. But in the future, if you’d like to allow the dough to rise on the counter, do it that way. Do whatever is easiest and will give you the best results. If you really only did keep in on to 400F for 1 minute and hours later you feel your bread was actually starting to cook, then your oven is very unique and not like any I’ve ever had. Thanks for trying the recipe.
Can I use dark brown sugar instead of light?
And will milk and vinegar work for the buttermilk?
Yes.
Probably, but I haven’t personally tested so I cannot speak with absolute certainty.
My dough rose beautifully! I was so excited. I tried the overnight option and my rolls will not rise this morning :( I’m tired of waiting and I’m going to bake them anyway. I’m sure they’ll still taste good but won’t be quite as big and beautiful. What do you think went wrong?
Hmmm, I’m thinking that maybe your fridge was very cold? and something happened overnight? I really have never had this happen to me.
Generally when I pull my overnight rolls out from the fridge the next morning (I make 99% of all cinnamon rolls or sweet rolls using an overnight option b/c I cannot get up so early to start things!) but normally they’re ‘busting at the seams’, super puffy and continued to rise in the fridge overnight and then on the counter for another hour or so they rise more.
I have a feeling that once baked, these probably will puff up for you. And by now you’ve baked them so LMK how it went!
These are awesome, Avery! I’ll take 293847329428935.
Oh, Averie. It’s no secret anymore: you’re my favorite blogger ever. From your gorgeous, stunningly perfect photography to your expert, perfectly-executed and delicious recipes, you’re the one. If you ever want another spouse, I’m your girl. I’m excellent at doing dishes and vacuuming. Also, I’ll let you buy all the Anthro dishes your heart desires!
In exchange, can I please just go to town on a pan of these rolls? Kthanks :)
Girl I wish you lived closer. I donate so much food every day. Every day I make something, there’s another pan of bars (minus a couple pieces), cakes, cookies, etc. that go out the door! I need to be able to fit in my clothes and my family too :) But I’d love to share and love all your sweet comments today!! You’re the best!! xoxox
Averie – these look A-MAZING. I am doing some baking to bring into work and am thinking about these! If I were to use 2 smaller pans (rather than 1 9×13 – easier for me to bring with me in the morning & leave some at home!) what would you suggest? Any thoughts on baking times or pan sizes that would work?
Looking forward to hearing back from you!
Love your recipes! :)
Two 8×8’s is fine and baking time will be about the same, maybe slightly less. Watch them like a HAWK! :)
Thanks so much! I’ll def watch them like a hawk; I’m looking forward to these!
Pinned for others to see too! :)
Thanks for pinning! Enjoy! LMK how it goes!
Lately I’ve been craving cinnamon rolls and these look incredible! I totally want to wake up to one of these with my morning coffee :D Need to star lacing up my running shoes now for these babies! For some reason, running is easier when you can come home to something like these ;)
running is easier when you can come home to something like these ;) = SO TRUE!! As a high-mileage runner, I can totally relate!
These look totally dreamy, Averie!!
These are absolutely stunning Averie! What a breakfast (or dessert), but I like it for breakfast better! Pinned :) Hope you are having a great weekend!
Thanks for pinning, Chelsea! Can’t believe you’re up….I’ve got bread in the oven for a photo shoot :) Have a great Sunday!