I’ve been wanting to make Nanaimo bars for ages and finally got around to it. If you’ve never heard of Nanaimo bars, that’s okay. Now you may just crave something you didn’t even know existed moments ago.
Sort of like I crave things at Anthropologie seconds after I walk in the door, and had I not even ventured in, I would have been none the wiser.

Nanaimo bars are named after the city of Nanaimo in British Colombia. Many consider Nanaimo bars to be Cananda’s national dessert, which doesn’t add any pressure or anything posting a recipe for the national dessert of a nation that’s not my own.
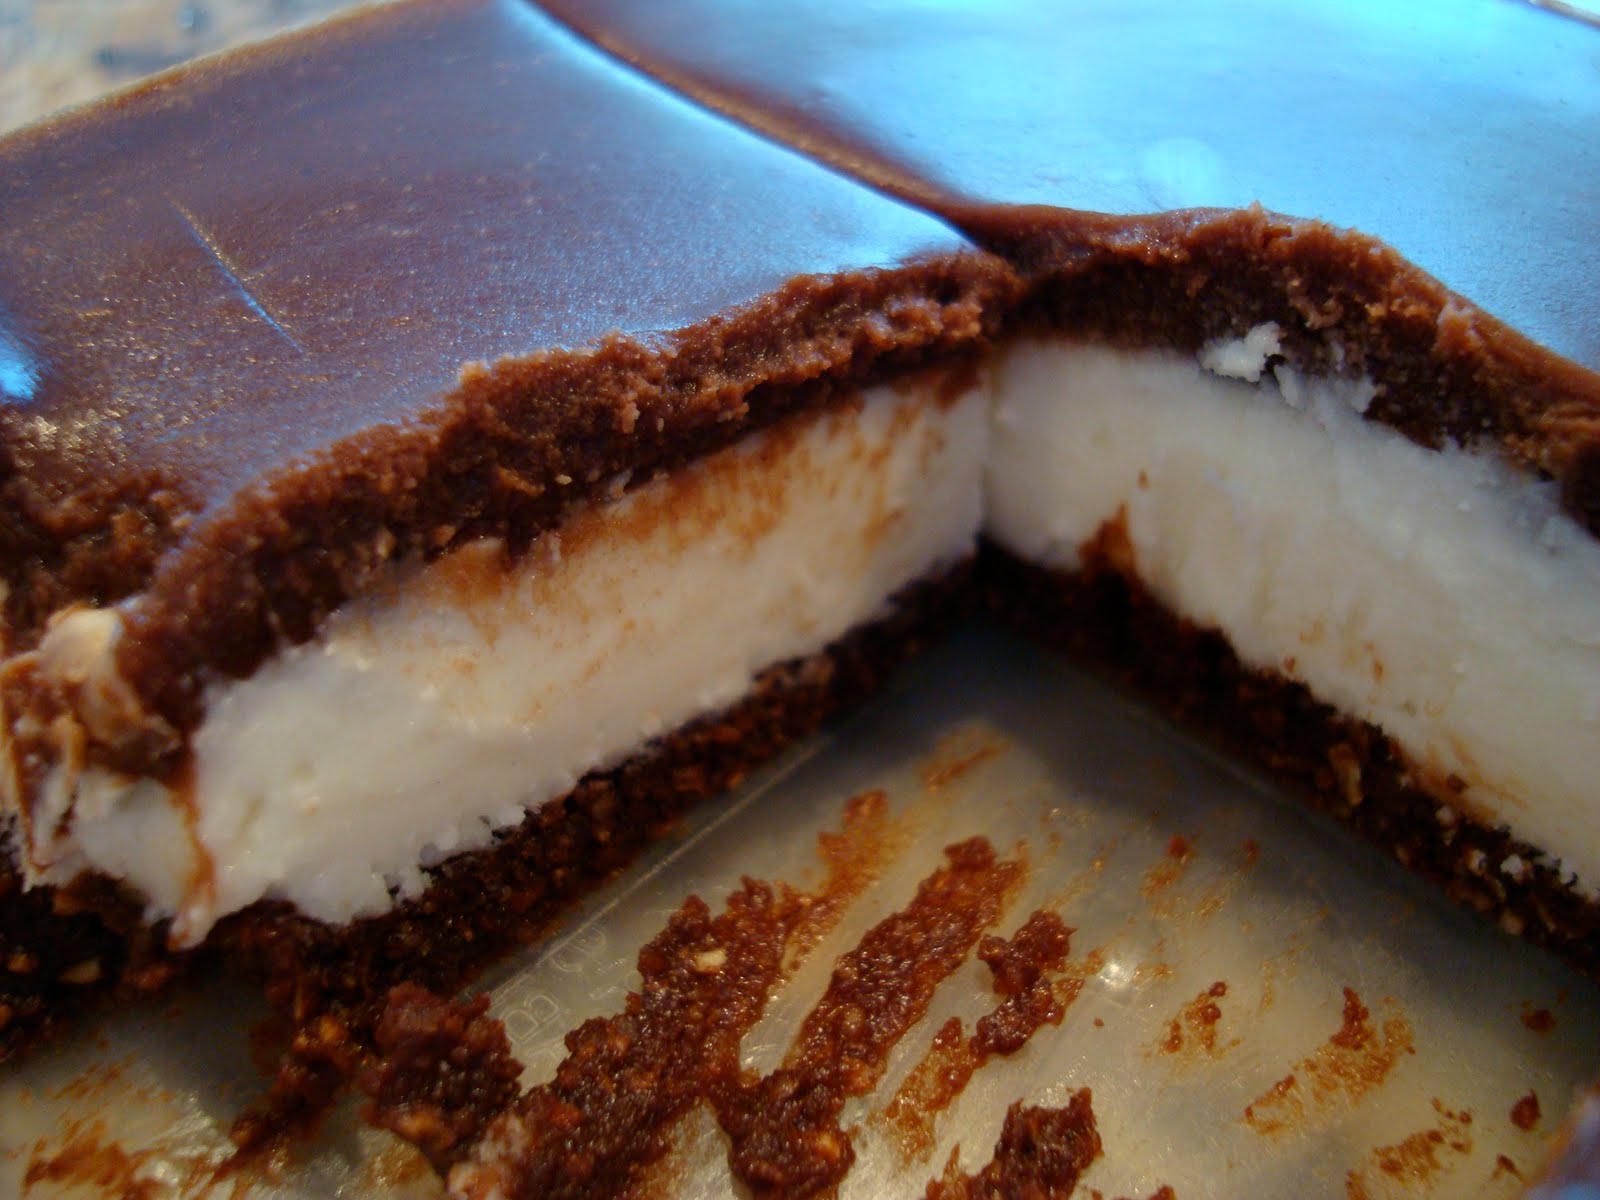
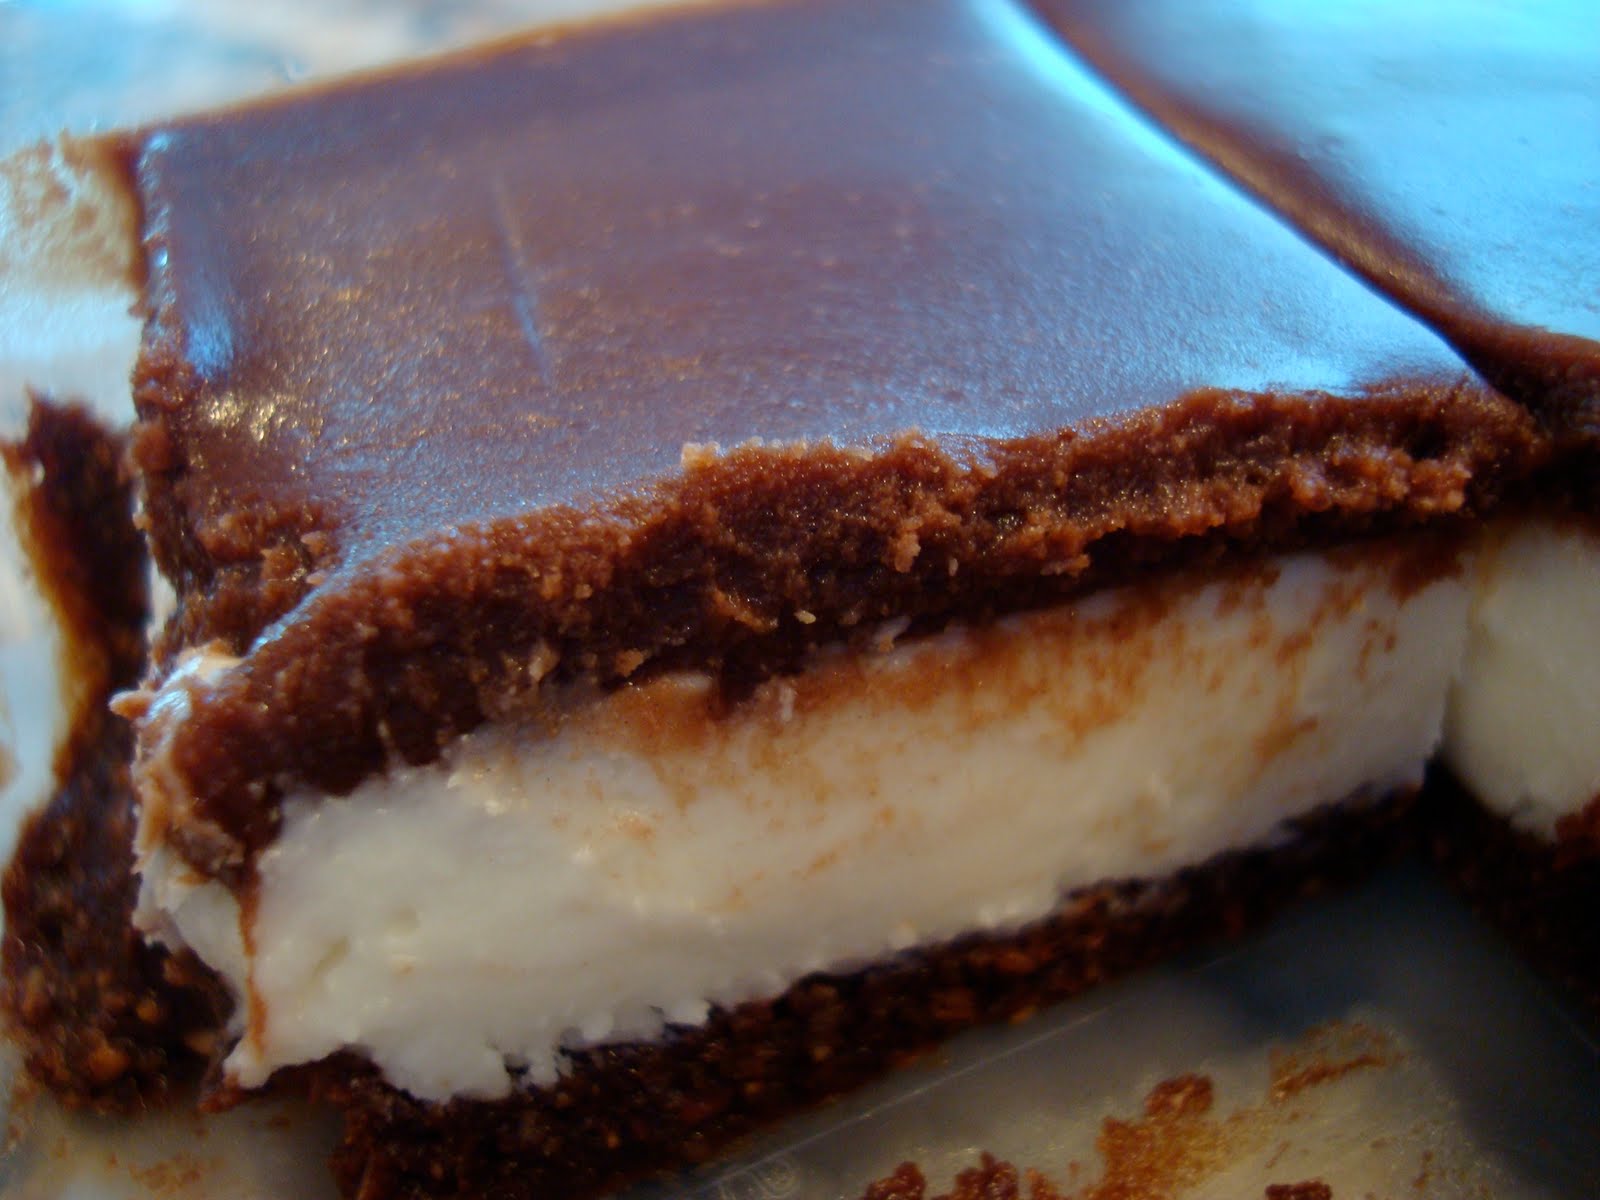
They’re no-bake bars consisting of three layers. A chocolate-graham-coconut-almond flour crust, topped with a vanilla custard-buttercream, and they’re finished with a buttery slick of melted chocolate. Rich much?
They’ve been on my radar screen for years, but as I was thumbing through the October issue of Saveur, I came across a recipe for them and the accompanying photo was taken by photographer Penny de los Santos, with whom I traveled to Mexico City on a food photography trip a few years back. That trip turned out to be more of a spiritual pilgrimage than I ever imagined, with very jaw-dropping sights and very interesting people-watching. When I saw Penny’s photo of the Nanaimo bars in Saveur, it jumped off the page at me and resonated with me so much that the bars were catapulted from the ‘one day I’ll make’ pile to the ‘I must make these now’ category.

The bars are not difficult to make, and they’re no-bake and it’s hard to screw something up too badly if you don’t even turn the oven on, but there are three layers and many steps, and organization is key. Before beginning, read the recipe over a few times and have everything ready and in place (mise en place). This is always a good idea when cooking, but particularly so in this recipe since you don’t want to waste over a half pound of butter for nothing.
Yes, they do use two and a half sticks, twenty ounces, of butter for an 8-by-8-inch pan of bars. The beauty is that you need just a small square for total full-belly satiation. I’d rather have a couple dense and rich bites of something than a serving of airy chips, then some light ‘n crispy crackers, and then finally a cookie or two because I never felt the satisfied with all the puffed air and crispy crunchy nothings. That’s not an issue here.
The base layer is made by melting one stick of butter, adding sugar and cocoa powder to it, then adding one egg. The Saveur recipe does not call for the mixture to be cooked after adding the egg, but I preferred not to have bars with a raw egg crust and adapted the recipe and cooked the mixture. To the cooked mixture, graham cracker crumbs, coconut flakes, and almond flour are folded in.
The base layer, on it’s own, is amazing. This is my favorite layer and part of the bars. It’s got so much going on and I could just indulge in this layer and be completely satisfied. There’s density and richness from the butter and egg; and sweetness from the sugar, coconut flakes, and graham cracker crumbs. The cocoa powder infuses chocolate flavor in an understated way, not overpowering the graham crackers or coconut. There’s plenty of texture and little bits that will get stuck in your teeth from the graham crackers, almond flour, and coconut. From both a flavor and texture perspective, this is my dream layer. Set dreams in a pan aside; and get busy making the middle layer.

To make the middle layer, combine confectioners’ sugar, cream, and either dry milk powder, pudding mix, or custard powder. Using custard powder is the traditional Canadian way, but since it’s not readily available in many areas, and because the Saveur recipe calls for dry milk powder, I used that. I had it I had on hand from making Crack Pie.
Although I have not had the traditional Canadian bars made using custard powder, and maybe I would change my tune if I tried them that way, but my opinion is that if you don’t have custard powder or milk powder, making a creamier version of a standard-issue vanilla buttercream with an extra splash of cream, would likely be just fine. Two and a half cups of confectioners’ sugar dominates whatever it’s beaten with and I thought this layer tasted much like vanilla buttercream, albeit slightly runnier since cream rather than butter is used.
Spread the fluffy cloud mixture over the dark crust, and begentle when spreading it, so everything stays nice and neat. Set the two-tone pan aside and prepare the final layer.

The final layer is mixture of melted butter and chocolate and although the sounds simple enough, I had a voice in my head telling me this wasn’t going to be ideal situation. I ignored the voice, which never bodes well. After a melted chocolate-butter mixture cools and sets back up at room temperature, it will be prone to cracking when attempting to slice it. But because I wanted to stay as close to traditional Nanaimo bars as possible, I did what the recipe said. And you know what, it cracked when I sliced it, as I suspected it would. Should have listened to that voice because as I was slicing through the rock hard chocolate, my delicate white fluffy layer was splooging out the sides of the bars. And four letter words were splooging out of my mouth as it was happening.
Cracked chocolate doesn’t effect the taste but after going to the work of making and creating the three layers and preparing them with precision and careful diligence, cracks are the pits. In the future, I would either just melt one cup semi-sweet chocolate chips for a firmer, yet crack-resistant chocolate topping. Or, I would use a chocolate ganache for a softer chocolate layer which never reaches full solidification, thus eliminating cracking, and subsequent filling-splooging issues, all together.
Whatever type of chocolate you pour on, you must refrigerate the bars for at least four hours, or overnight. Feel free to make these a few days in advance and keep them in the refrigerator until you’re ready to slice and serve.

Needless to say, these babies are rich, so easy does it with the size of the pieces. This is one time when bigger is not necessarily better and I read that traditional Nanaimo bars are sliced in the one- to two-inch range; thus an 8-by-8 inch pan should make at least 32 small, three-bite pieces. Ironically, I don’t deem this a sweet dessert,per se. Yes, it’s sweet, of course, but far less so than the average piece of birthday cake with frosting. However, it is very rich and filling and I loved every dense, satisfying, triple-layered bite.
When biting into a bar, I was able to savor the layers as a whole, yet separately. The base layer, so full of density and chewiness; the soft and creamy cloud-like fluffiness of the middle layer; and the intense dark chocolate final layer. All distinct and all good in their own right, but when teamed up, they become a literal triple-threat.

I think these would be perfect on a holiday party tray. They are visually impressive and although there are three layers, the active work time is only about thirty minutes. A very good use of a half hour of your time.
I hope I did Canada’s national dessert proud.


Pin This Recipe
Enjoy AverieCooks.com Without Ads! 🆕
Go Ad Free
Nanaimo Bars
Ingredients
- 20 tablespoons unsalted butter, softened (2 1/2 sticks)
- 5 tablespoons cocoa powder
- ¼ cup granulated sugar
- 1 large egg
- 1 ¼ cups graham cracker crumbs
- 1 cup sweetened shredded coconut flakes
- ½ cup almond flour, or heaping 1/2 cup almonds, ground
- 2 ½ to 3 cups confectioners' sugar
- 3 tablespoons cream or half-and-half
- 2 tablespoons dry powdered milk, or dry instant vanilla pudding mix or Bird's Custard Powder 300g
- 2 teaspoons vanilla extract
- 8 ounces dark or bittersweet chocolate, I used 6 ounces of 72% chocolate and 2 ounces of semi-sweet chocolate chips
Instructions
- Prepare an 8-by-8-inch pan by lining with aluminum foil and spray with cooking spray (you must line the pan and foil is highly recommend over parchment, which shifts around inside the pan too much); set pan aside.
- For the Base Layer - In a medium-sized saucepan over low heat, melt 8 tablespoons butter (1 stick). Remove pan from the heat and add the granulated sugar, cocoa powder, and whisk to combine. Whisk in the egg. Return pan to low heat and cook for about 90 seconds, stirring continuously, just until the mixture thickens slightly and this also gently heats and cooks the egg. Remove pan from heat and add graham cracker crumbs, coconut flakes, almonds, and stir to combine. Transfer mixture to prepared pan, pressing evenly into the bottom in a smooth flat layer; set aside.
- For the Middle Layer - To the mixing bowl of a stand mixer fitted with the paddle attachment, combine 8 tablespoons butter (1 stick), confectioners' sugar (I started out with 2 1/2 cups but found 3 cups was better and made mixture thicker and less runny), cream, powdered milk (I do not think that the powdered milk, vanilla pudding, or custard mix is truly necessary, but classic Nanaimo bars use it; I wouldn't race out and buy it if I didn't have it on hand), vanilla and beat for 3 to 5 minutes, or until smooth and fluffy, stopping to scrape down the sides of the bowl as necessary. Spread over chocolate base layer; set aside.
- For the Top Layer - In a medium microwave-safe bowl, combine 4 tablespoons butter (1/2 stick) and chocolate and heat on high power to melt, about 1 minute and whisk to combine. Heat in 15-second increments until mixture can be whisked silky and smooth. Carefully spread over vanilla layer, taking your time and being very careful with your knife or spatula as not to muddle the layers. Place pan into refrigerator for at least 4 hours, or until set; overnight is fine. I would err on the side of longer as not to have a mess when you slice into them. Slice into modest squares, approximately 1 to 2-inches each, as bars are very rich.
Notes
Nutrition
Nutrition information is automatically calculated, so should only be used as an approximation.
©averiecooks.com. Content and photographs are copyright protected. Sharing of this recipe is both encouraged and appreciated. Copying and/or pasting full recipes to any social media is strictly prohibited.
Related Recipes:
White and Dark Chocolate Cream Cheese Chocolate Cake Bars – These bars are the opposite of Nanaimo bars in terms of work and come together in minutes and are not fussy in the least. A chocolate cake-mix crust, topped with a flood of cream cheese and sweetened condensed milk, along with plenty of white and dark chocolate chips sprinkled in. Very easy and always a hit with crowds

Creme de Menthe Bars (no-bake, vegan, GF) – One of first ‘complicated’ or more fussy desserts I ever blogged about. They are a vegan, gluten-free version of the classic creme de menthe bars that I grew up adoring. Although I didn’t add green food coloring to the white layer, you could in order to give them more visual authenticity. The taste is spot on to the original and not a drop of butter or gluten is used
Triple Layer Fudgy Mint Oreo Brownies – Uber fudgy brownies, a layer of mint buttercream, topped with crumbled mint Oreos. Perfect for Christmas parties, St. Paddy’s Day or anytime. There’s never a bad time for these

Oreo Cookie-Stuffed Brownies with Vanilla Buttercream Frosting – Another layered brownie, and this one with a black and white theme

Chocolate Coconut Chia and Oat Bars (no-bake, vegan, GF) – a 2009-era recipe (and 2009-era photography) using cocoa powder, shredded coconut, chia seeds, and oats. There’s remarkable similarity between them and the base layer of the Nanaimo Bars, and not a drop of butter was used
Magic Eight Bars – I grew up eating Seven Layer Bars (also known as Magic Bars or Hello Dolly Bars). I tweaked the original by omitting the nuts and added an additional layer. So much of what I love about Magic Bars, the graham crackers, butter, coconut, and chocolate, is included in the base layer of the Nanaimo Bars, which is why I love that layer so much

Have you ever tried a Nanaimo Bar? Or heard of them?
If you have any recipes, experiences, or a favorite layered bar or layer cake recipe, feel free to link it up.
Thanks for the entries in the South Beach Bars Sampler Pack Giveaway and in the Cuisinart for Keurig Single Cup Coffee Maker Giveaway


I use the recipe from Nanimo Canada but sub out instant vanilla pudding for the custard powder. One hint to prevent cracking is to score the top layer after letting it cool but before it’s completely hardened. https://www.nanaimo.ca/about-nanaimo/nanaimo-bars
I will be trying the use of almond flour in place of the chopped almonds
( I usually put the graham crackers and almonds in food processor).
Thanks for the info! This post is 10 years old and I haven’t thought about it in ages!
I’m Canadian and make these often – but only with the custard powder! I add extra vanilla. Most grocery stores here sell ready made Nanaimo Bars but they just aren’t as good as homemade! If nuts aren’t an issue, traditional Nanaimo Bars have finely ground walnuts.
To help with the cracking, those ones are for you to eat. Seriously though, it gets annoying. Using a touch less milk in the filling helps, and also letting them sit on the counter – but not to room temp – whenever I do that the filling squishes out and they crack worse than ever! It also helps to lift the whole slab of bars right out of the pan to cut them, use a long knife and cut each row in one sharp downward motion.
I’m going to make some now! One more thing. I use less sugar in the base – personal taste.
I’m also planning to try them with a cream cheese filling and baking them sometime – but then they won’t be Nanaimo Bars. :)
Great tips and tricks!
Is there something you can substitute for the almond flour?
In this particular recipe, not really. I mean I am sure you could experiment on your own but off the top of my head, no suggestions. Other than possibly another nut flour, i.e. walnut flour or pecan flour.
Hey! I’m going to make this recipe! I stumbled upon Bird’s Custard powder at Cost Plus World Market in Buford, GA. When I saw it, I said, “OMG Averie!”
https://www.worldmarket.com/product/birds-custard-powder.do?from=Search&cx=0
Oh wow, great find! Thanks for the link! World Market has some totally offbeat and awesome finds sometimes!
Oh, gosh, these are AMAZING! I skipped the custard powder / pudding / powdered milk because I don’t have any, and I still felt that there were plenty of flavors going on in these bars without them. I also didn’t have ground almonds or almond flour and almost didn’t make the bars because of that, but then I thought, hey, I have whole almonds and a blender–maybe that might work! And it did. In fact my blender was able to handle the almonds very easily. :D
I used chocolate chips instead of baking chocolate for the top layer and didn’t have cracking problems. I’d say to do that rather than make a ganache. May as well stay closer to tradition!
Anyway, thanks for sharing the recipe! I loved them!
Glad you loved these and good call on grinding your own almonds and using chocolate chips (and glad it didn’t crack)! Thanks for trying these and the field report!
I don’t know how I missed these bars but they are gorgeous – love the background too. Pinned!
They’re an oldie & thanks for pinning!
I came across this. Ya just have to try these with the Bird’s Custard. It is in a league by itself. We would have these every Christmas. Keep it chilled and bring to near room temperature – then you cut it. Small little pieces because they are rich. And again, can’t emphasize enough the importance of Bird’s. Not so sweet and adds a lovely flavor. And recipes that I’ve seen have this for the bottom: ” Bottom Layer: In double boiler, melt butter, sugar and cocoa; add egg and cook until thickened. Add crumbs, nuts and coconut. Press into pan.” 1 stick of butter not 20 tbsps!!! ick!
Hope that helps.
Wow, I’m feeling like a pretty pathetic Canadian right now. I had no idea Nanaimo bars hailed from Nanaimo, BC!!! And I grew up in the province next door so it’s not like I’ve never heard of the city!
Anyway, these look awesome!! My sisters and I loved these growing up. Our grandparents would treat us with the ones from Safeway (Safeway’s were always the best) when we’d go camping with them. I can’t wait to make these for them when I visit home next month!!
These look delish. I am Canadian from British Columbia. I lived in Nanaimo for years. Guess what? You can buy the Bird’s Custard from World Market/Cost Plus in California! Well, in San Jose anyway.
Great to know. I’ll check the San Diego stores!