
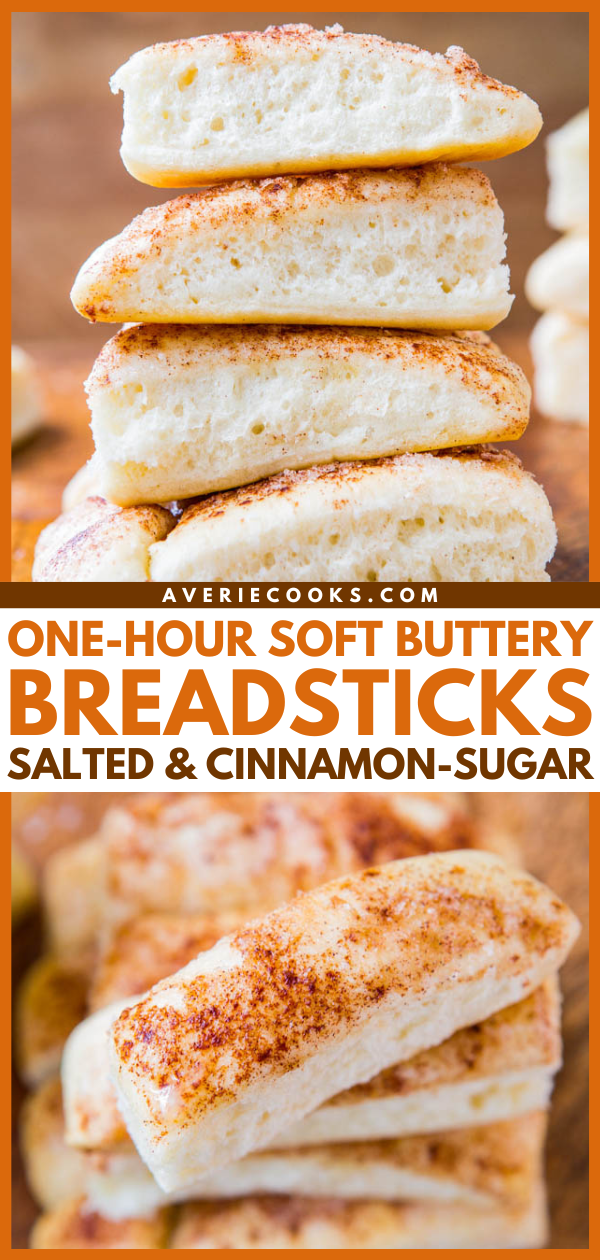
Super Quick Homemade Breadsticks — There’s only one hour that separates you from warm, fresh, homemade breadsticks. 10 minutes to make dough and roll out, 30 minutes to rise, 20 minutes to bake!
 - It's Easy! Recipe and Step-By-Step Photos at averiecooks.com")
Easiest Breadsticks Recipe
You have no excuses not to make these soft, buttery, warm, foolproof breadsticks.
Ready in an hour. Everyone has an hour. It’ll be the best use of one hour all week, I promise.
At a restaurant, if you’re the type of person who can devour a basket of soft breadsticks before they bring your food, and by the time you do get your food, you’ve eaten so many breadsticks that you don’t even want it, this is the recipe for you.
Then again, maybe not. Make it at your own risk.
 - It's Easy! Recipe and Step-By-Step Photos at averiecooks.com")
Warm and fresh from the oven, these accidentally vegan breadsticks are ridiculously good and cost probably less than a buck to make. Two cups of flour, a little butter or buttery spread, and yeast are the only real costs.
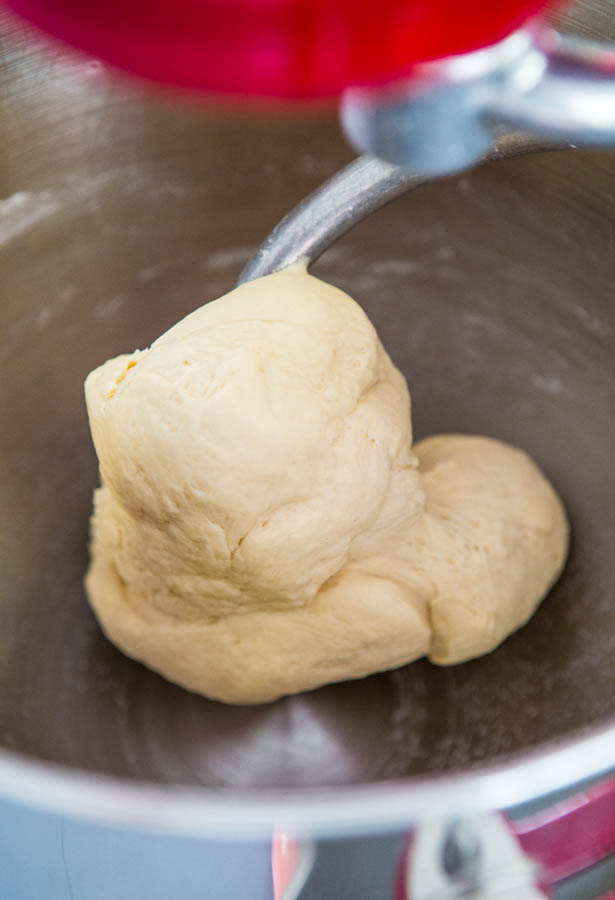
If you’ve never worked with yeast or have a yeast phobia, you can get over all that now. You simply combine the ingredients into a mixing bowl and let your stand mixer do the work, kneading for about 7 minutes.
Don’t have a stand mixer? Knead by hand on your counter.
Think of it as exercise in advance of all the white, buttery carbs you’re about to ingest.
They’re every bit as good as restaurant breadsticks (or mall pretzels) and you’ll want more than a couple. You’ve been warned.
 - It's Easy! Recipe and Step-By-Step Photos at averiecooks.com")
Ingredients for Homemade Breadsticks
For this quick breadstick recipe, you’ll need the following ingredients:
- All-purpose flour
- Water
- Instant yeast
- Olive oil
- Granulated sugar
- Salt
- Unsalted butter (or vegan butter)
- Cinnamon-sugar (only if you want to make cinnamon-sugar breadsticks)
Can Whole Wheat Flour Be Used?
If you want to use whole wheat flour, read this post, don’t exceed more than 50% by volume of whole wheat flour, and if you try it, let me know how it goes, because I haven’t tried.
How to Make Homemade Breadsticks
I hate doing step-by-step photos but I want you to see how easy it is. I really hope you make breadsticks now!
Here’s an overview of how the quick, buttery breadsticks are made:
- Combine all of the ingredients in the bowl of a stand mixer and knead for about 7 minutes.
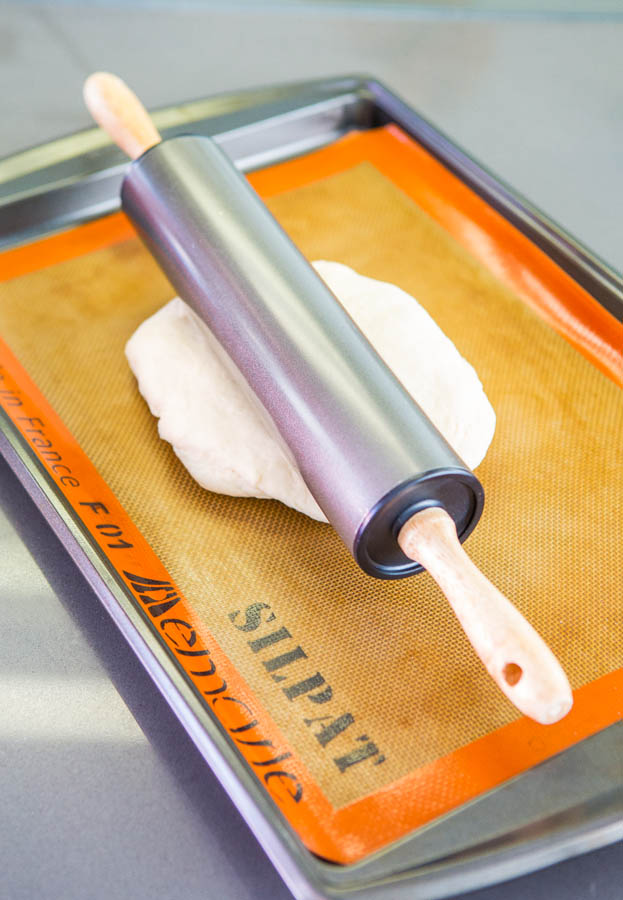
- Transfer the dough to a baking sheet and roll out to about 8 inches by 12 inches. No need to measure, just eyeball it and roll into a rectangle that covers about two-thirds of a baking sheet.
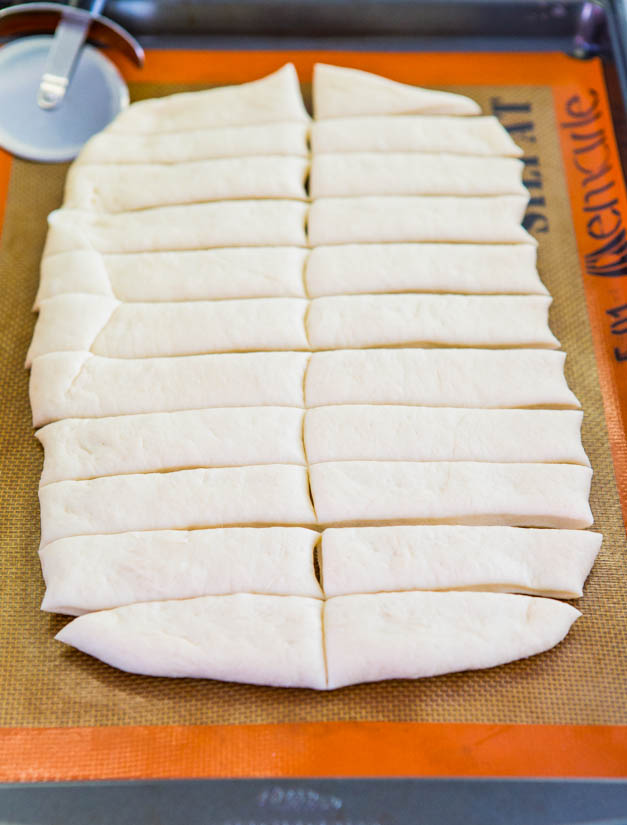
- Score the dough with a pizza cutter. One long slice down the middle, and then I made 11 vertical slices, creating 22 breadsticks. Depending on the size and shape of your dough, and your size preference for breadsticks, you may get more or less breadsticks.
- Cover the pan with a piece of plastic wrap and place it in a warm, draft-free, place to rise.
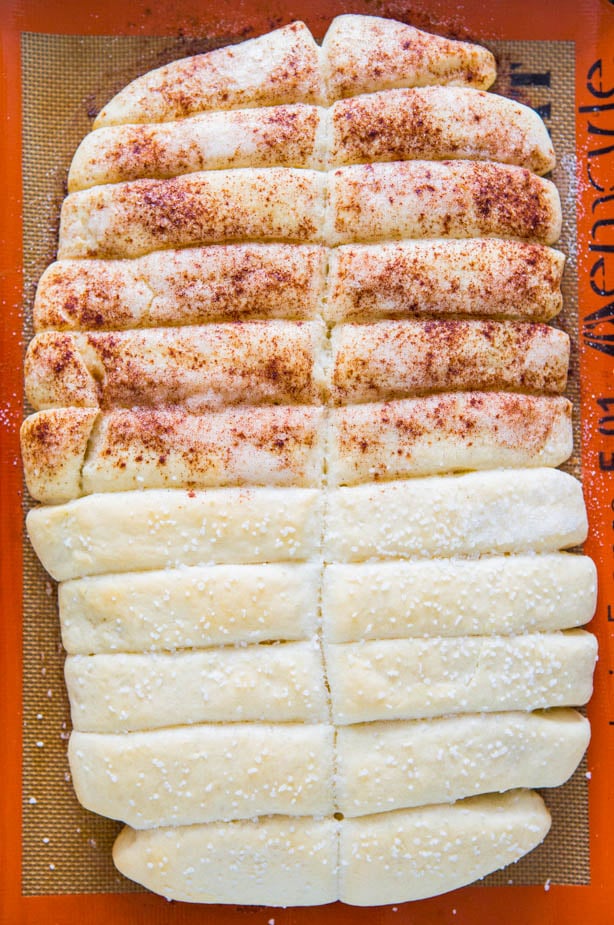
- Before baking, brush dough with melted butter (or vegan buttery spread), and I sprinkled with Kosher salt and a cinnamon-sugar mixture. You could also sprinkle with Parmesan cheese, chives, garlic or onion powder, poppy or sesame seeds, for an everything-bagel type flavor.
- Bake for about 20 minutes, or until slightly golden and cooked through. After baking, drizzle with melted butter and dive in.

How to Help Dough Rise in a Cold House
A trick to creating a warm environment in the dead of winter or in a cold house is to power you oven on to 400F for 1 minute. Then power your oven off.
In that 1 minute, your oven probably got to about 90F degrees inside, the temp on a nice, warm summer day, which is how yeast thrive.
Quickly slide the baking sheet into the oven (again, your oven should be off) and let the dough rise for about 20 minutes. After 20 minutes, you’ll need to preheat your oven so you can bake.
Don’t preheat with the tray inside. Take the tray out, put it on the stovetop, and preheat the oven (for real this time) to 350F.
In total, the dough will have had about 30 minutes to rise. In just 30 minutes, you can see how much it rose!
 - It's Easy! Recipe and Step-By-Step Photos at averiecooks.com")
Dipping Sauces for Breadsticks
When it comes times to chow down on these quick and easy breadsticks, you have a few dipping sauce options:
 - It's Easy! Recipe and Step-By-Step Photos at averiecooks.com")
Tips for Making Light and Fluffy Breadsticks
Yeast:
I used Red Star Platinum Yeast and it’s the only yeast I bake with because it’s the best and it never lets me down. If a novice bread-maker, consider this yeast your insurance against goofs because it’s very forgiving.
Since it’s an instant yeast, you don’t have to proof it (let it stand with warm liquids for 10 minutes or until foamy). You simply add it with the other ingredients.
If you are an experienced bread maker, you’re going to love the extra puff and oven-spring you get with the Platinum. Your baked goods will rise higher and faster than you’re used to. It blows the pants off other yeasts I’ve tried!
Flour:
I used King Arthur All-Purpose because I wanted the breadsticks to stay very soft. Bread Flour will lend a chewier, thicker, denser result, more bagel-like, but may be used if you wish.
 - It's Easy! Recipe and Step-By-Step Photos at averiecooks.com")
One-Hour Soft Buttery Breadsticks – Salted and Cinnamon-Sugar
Ingredients
- 2 ¼ cups all-purpose flour, bread flour may be substituted; breadsticks will be firmer and chewier rather than softer and fluffier; you may only need 2 cups bread flour
- 1 cup water, warmed to manufacturer’s directions
- 2 ¼ teaspoons instant dry yeast (one 1/4-ounce packet, I use Red Star Platinum
- 1 tablespoon olive oil
- 1 teaspoon granulated sugar
- ½ teaspoon salt, optional and to taste (I prefer to sprinkle salt over the baked breadsticks than add it to the dough)
- ¼ cup unsalted butter, or vegan buttery spread melted for brushing/drizzling, divided
- Kosher or sea salt for sprinkling, optional
- cinnamon-sugar for sprinkling, optional (I use 2 tablespoons granulated sugar to 1 heaping teaspoon cinnamon)
Instructions
- To the bowl of a stand mixer fitted with the dough hook (or large mixing bowl and hand-knead), combine flour, water, yeast, oil, sugar, optional salt, and knead for about 7 minutes, or until dough is soft, smooth, and has come together in a firm mass. If hand-kneading, you may need to knead a few minutes longer. Note – Based brand of yeast used, water temperature will vary. Red Star Platinum yeast calls for a warmer temperature than most, 120 to 130F; other brands are much lower, about 95 to 105F. Warm water according to the yeast manufacturer’s recommendations on the packaging. Taking the temperature with a digital thermometer is recommended, but if you’re not, make sure the water is warm, not hot. Err on the cooler rather than hotter side so you don’t kill the yeast.
- Turn dough out onto a Silpat-lined or greased standard-sized baking sheet.
- Using a rolling pin, roll dough into a rectangle that’s approximately 8 inches by 12 inches, and about 1-inch thick. No need to measure, just eyeball it and roll into a rectangle that covers about two-thirds of a standard baking sheet. The dough may be a little stubborn to roll, very springy and may want to recoil, but just keep rolling and finessing until you’ve gotten it to the proper size. I find rotating the pan, flipping the dough over, rolling more, and repeating is helpful.
- Score the dough with a pizza cutter. One long slice down the middle, and then I made 11 vertical slices, creating 22 breadsticks. Depending on the size and shape of your dough, and your size preference for breadsticks, you may get more or less breadsticks.
- Cover the pan with a piece of plasticwrap and place it in a warm, draft-free, place to rise. Read carefully: A trick to creating a warm environment in the dead of winter or in a cold house is to power you oven on to 400F for 1 minute. Then power your oven off. In that 1 minute, your oven probably got to about 90F degrees inside, the temp on a nice, warm summer day, which is how yeast thrive. Quickly slide the baking sheet into the oven (again, your oven should be off) and let the dough rise for about 20 minutes.
- After 20 minutes, remove the tray from the oven, put it on the stovetop, and preheat the oven (for real this time) to 350F. In total, the dough will have had about 30 minutes to rise before baking.
- Before baking, generously brush dough with about half of the melted butter (or a vegan buttery spread); reserve remainder.
- Optionally, sprinkle with Kosher salt and/or cinnamon-sugar. Or try Parmesan cheese, chives, garlic or onion powder, poppy or sesame seeds.
- Bake for about 20 minutes, or until slightly golden, firm to the touch, and cooked through. After baking, drizzle with remaining melted butter. Breadsticks are best warm and fresh, but will keep airtight for up to 2 days. Before eating leftovers, heat for 5 seconds in micro to soften them up, adding a pat of butter if desired.
- Adapted from Soft Buttery One-Hour Pretzels (vegan) and One Hour Whole Wheat Pizza Dough (vegan)
Nutrition
Nutrition information is automatically calculated, so should only be used as an approximation.
©averiecooks.com. Content and photographs are copyright protected. Sharing of this recipe is both encouraged and appreciated. Copying and/or pasting full recipes to any social media is strictly prohibited.
More Quick & Easy Bread Recipes:
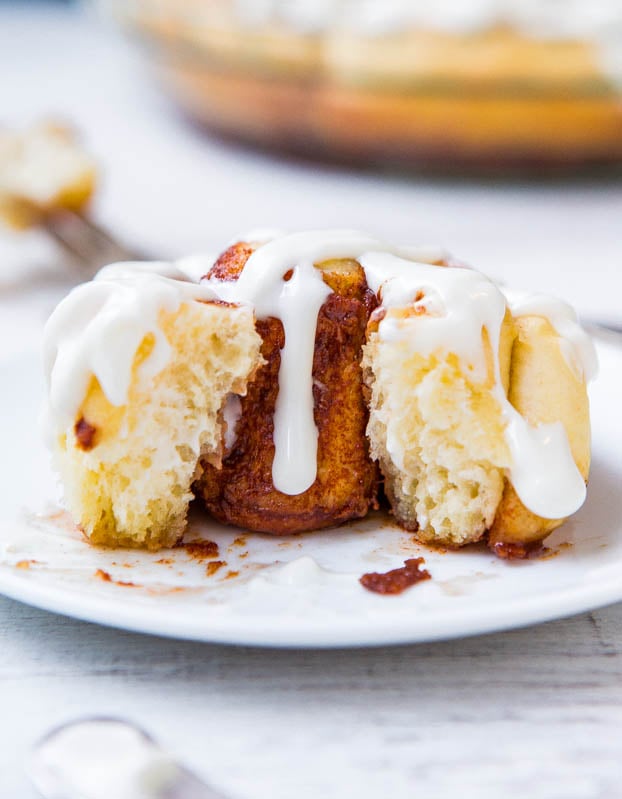
1-Hour Homemade Cinnamon Rolls with Cream Cheese Frosting — It’s possible to make soft, light, fluffy cinnamon rolls from scratch in 1 hour! These are yeast cinnamon rolls topped with a homemade cream cheese frosting.
1-Hour Soft Pretzels — Just like the mall but homemade and ready in 1 hour!
")
1-Hour Whole Wheat Pizza Dough — Stop buying pizza dough. Make your own in under 1 hour!
")
No-Knead Make Ahead Dinner Rolls – An amazingly easy dinner roll recipe!

Whole Wheat No-Knead Dinner Rolls — Working with wheat flour and yeast is usually the kiss of death but these rolls are light, fluffy, soft and you’d never guess made exclusively with whole wheat flour

30 Minute Honey Whole Wheat Skillet Bread (no-knead, no yeast) – You’ll never believe that bread this light is made without yeast or kneading, and in 30 minutes
")

These breadsticks look dangerously delicious – I can’t pick a favorite so that just means I need to try both variations!
Oh boy these looks absolutely phenomenal! Yes – I have to seriously hold off when I’m at a restaurant because I could devour that warm bread basket before my meal arrives and not even be hungry for the man dish. Make at your own risk, indeed! ;)
These breadstick look gorgeous and so yummy! Definitively going to make these next time I have company over! I don’t think I could trust myself around a big basket full of warm bread sticks! :D
I’ve said this before, but it bears repeating – I NEVER miss bread until I read your bread posts!
This – if you’re the type of person who can devour a basket of soft breadsticks before they bring your food, and by the time you do get your food, you’ve eaten so many breadsticks that you don’t even want it <– THAT IS ME. Or was, anyway.
I can smell these in my house right now even though I'm not baking them. The smell is jumping out of my computer!
They were so good, Katie! I usually prefer my mindless calories in cookie form, but these were so good. Glad that my pics/writing is good enough to make you miss bread, even though you normally don’t. I mean, sorry for you of course!! (but at least I’ve done my job)
You’re right Averie–ZERO excuse not to bake these fluffy breadsticks. Of course, why would I ever want to make excuses when I could be eating them instead? ;-) Love the step by step photos you have in here. I know that can be kind of a pain to pause for pics when you are in the midst of baking, but I know so many people are going to truly appreciate them.
Pain isn’t even the word. But yes with yeast dough, I know it’s really helpful so I dealt with it :) so thanks for noticing!
So soft and doughy!! These look like some of the best breadsticks! And thanks for all the step-by-step photos! Those are such a pain. Especially with bread!
I have to give these one a try soon, my family love buttery soft bread sticks!
Pain isn’t even the word. But yes with yeast dough, I know it’s really helpful so I dealt with it :) so thanks for noticing and I know you know what it’s like with all the stuff you make!
These remind me of the breadsticks from Pizza Hut I used to love as a kid. That’s one of the few fast foods I still crave on occasion and now I can have it!
I was trying to think where/what these breadsticks were like and you just reminded me: PIZZA HUT!! omg yes!! Thanks for that and for the tweet too!
Whoa!! These looks incredible Averie..
thanks Erika!
what a great idea!
I’ll take one of each! Yum!!
Yum, yum, yum!!! These look A-mazing.
:)
Another perfectly timed post–my parents are coming to visit this weekend and I was planning to make a big pot of root veggie stew Friday. I think stew needs bread and I have 1 packet of yeast left. Meant to be!! Just 1 rise and ready in an hour–I love that! My husband will swoon over these (we all will)!
Well the timing is great! LMK how they go for you and what you and your family thinks!
Bread sticks are not that popular in Australia, but if it has yeast, flour and sugar in it. Count me in!
Wow dessert and a meal in one? I can sure use this recipe on a daily basis. I am always look for more ways to make meals easier. I might just try this one of your dip recipes, or that soup you did a while ago.^_^
If you try these, Lmk what you think!
With cinnamon and sugar, with salt, with whatever, I want these! Scrolling through this post I was also reminded how many of your bread recipes I want to make. Lastly, would it be a sin to make the sticks and eat them with butter?;)
would it be a sin to make the sticks and eat them with butter?;) <--- not at all! Go for it! :)
What a great recipe! The breadsticks I usually make take about 2 hours, so it will be great to have extra time. Trying these this weekend!
Awesome that they’ll take half as long! LMK what you think!
Dude, you know how crazy I am about carbs! Amazing. So light. So buttery. So perfect! And thanks for the tutorial – I’m always a bit of a wimp when it comes to yeast so these pictures are super helpful!
Well I’m glad you like the step shots and that they’re helpful! YAY! :) And thanks for the pin on my brownies earlier tonight! You’re seriously the best!